

Click with your bike
Are clipless pedals a good option for you? Iain Treloar helps you make an informed choice.
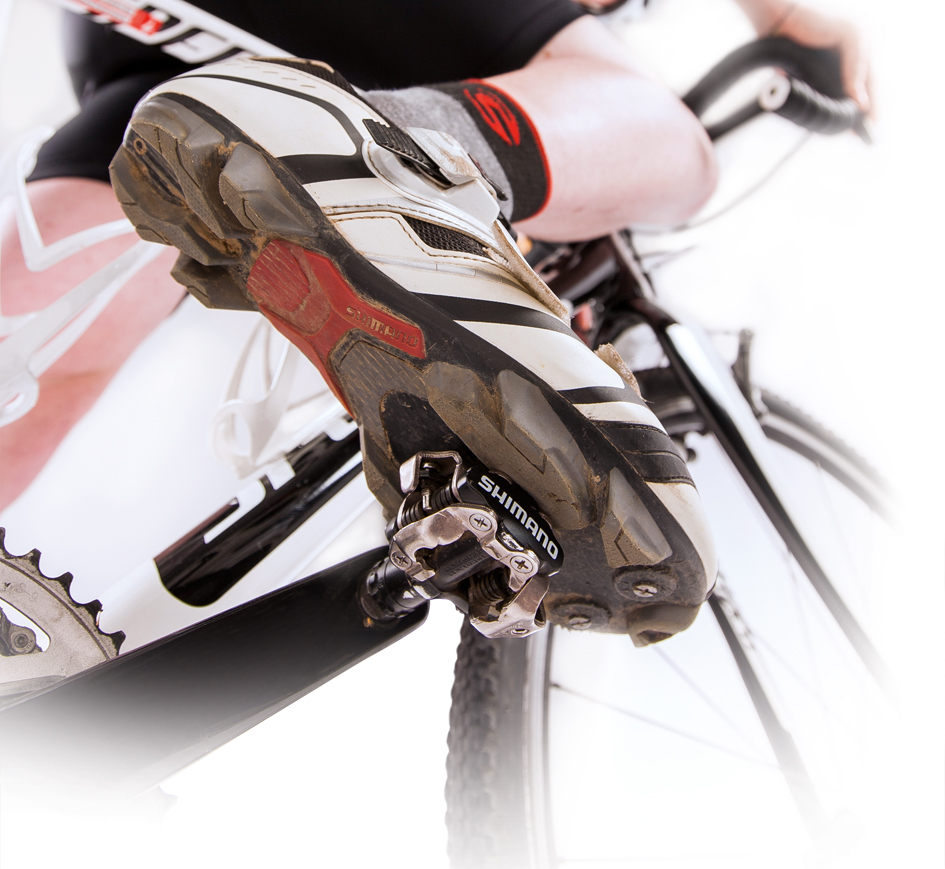
For many riders, the graduation from a flat platform pedal to a clip-in system is an important step, a sign of growing confidence in their bike-handling ability. Read Jane Still’s account for a personal perspective. There are some good reasons why you might want to become more attached to your pedals. Clipping in can stop your foot slipping off when applying power, help align your foot to ensure maximum efficiency, and potentially aid your pedal stroke by allowing you to pull up on the pedal as well as push down. The earliest – and still widely used – toe-clip system, consisting of a cage and strap, has the benefit of being able to be worn with conventional shoes. However, this system is fairly crude, with the safety disadvantage of not releasing in a crash. Toe clips are also not normally adjustable for fit, which means your foot may not be in its optimal position, and they can be awkward to get into; the weight of the cage means the pedals hang upside down when not in use. Toe clips do stop your foot slipping forward, but you have to be strapped in tightly to allow for easy pulling up of the pedal. The ‘clipless’ style of pedal – a clip-in system so named because it does away with the toe-clip – has a rich history, with styles patented as far back as the late 1800s. However, like so many cycling innovations, clipless pedals only became a commercial success when they began to be used by professional cyclists in the world’s biggest races. The breakthrough moment for clipless pedals came with Bernard Hinault’s 1985 Tour de France victory on an early Look-brand prototype (Look was previously best known as a manufacturer of ski bindings – technology on which their pedals was based). Greg LeMond and Hinault’s one–two in 1986 further confirmed the potential of this new pedal style and their market success was assured. A wide range of pedal systems by numerous companies now exists, leaving us with a confusing variety of competing brands. Broadly speaking, clipless pedal systems can be split into two groups – those for fast road riding, and those for other types of riding, such as commuting, mountain biking and touring. The second type are often called SPD-style pedals (Shimano Pedalling Dynamics), referring to the Shimano brand that developed and popularised this style. Clipless pedals only work with shoes that have cleats (see glossary below) attached. For road bikes, cleats have a three-bolt pattern, while the SPD-style clip-ins are a two-bolt pattern. Many road shoes offer the option to mount both types of cleats. 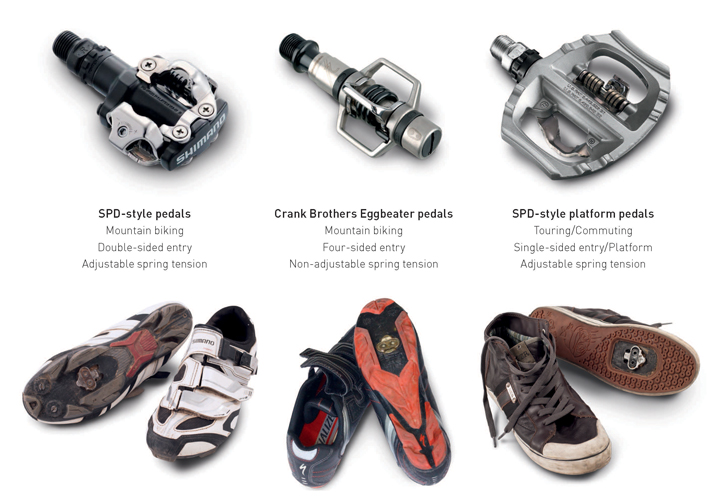
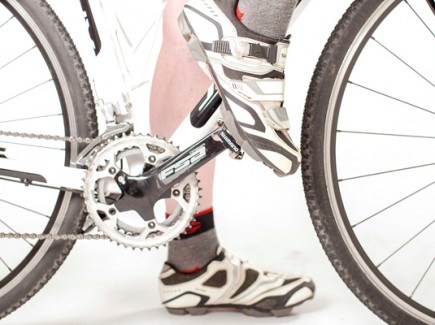
General-purpose SPD-style pedals
First popularised by Shimano with their SPD system, the key difference with these pedals to the road style is the cleats’ smaller surface area, which allows them to be recessed into the sole of the shoe. A number of benefits follow, the most obvious being significantly improved walkability, doing away with the duck waddle, click-clack and poor grip of the road shoes and their exposed cleats. The SPD-style cleats are also less prone to becoming clogged with mud and other trail debris as they are tucked away in the sole of the shoe, and the open nature of the pedals means that mud clearance is further improved there, too. As a result of their versatility, this pedal system has become very popular, and is used for all sorts of riding; mountain biking, touring, commuting and general recreation. The shoe styles available for this system are also very varied, and include sandals, trainers and smart-casual shoes. SPD-style shoes and pedals are not as technically efficient as the road system – the soles of the shoes tend not to be as stiff, and the smaller platform area doesn’t offer quite as good power transfer. For a large number of riders, however, the minor compromise in performance won’t be a factor and they will enjoy the additional sure-footedness off the bike. For a first-time clipless pedal user, the fact that SPD-style pedals are normally a multi-sided entry is a further benefit. Where the road pedals can take quite a bit of fiddling around with when setting off from traffic lights as you try to engage the pedal, SPD-style pedals tend to be easier for a beginner to get into and out of. Shimano continue to be the market leader in these pedal systems. Since the basic SPD was launched, their range has now expanded to include single-sided entry pedals with a standard platform on the other side – for those short trips to the shops where you really don’t want to get into your bike shoes – as well as road-specific SPDs and models with lower spring tension (see glossary), such as the new Click’R, for those new to clipping in and apprehensive about getting their foot out in time. Brands such as VP, Exus and BBB offer SPD-style platforms that either seek to improve on Shimano’s system or compete on price. Sometimes they use cleats measuring exactly the same as Shimano’s SPD and sometimes they’re subtly (but unworkably) different, so take care when purchasing replacement cleats if you’ve moved away from one of the dominant brands. The other brands are, in many ways, playing catch-up to the Shimano behemoth, particularly when it comes to mountain-bike use. Crank Brothers have differentiated themselves on the basis of their ultra-simple four-sided platform, the Eggbeater, reasoning that if two sides are good then four must be even better. The extremely open design also reduces the likelihood of sand and mud clogging the pedals. Besides Shimano and Crank Brothers, the other well-known players on the mountain-bike market tend to lean more to the very high-end. Both Look and Time have their own mountain bike options, in both cases claiming to offer a broader pedalling platform and lower weight than their competitors. However, finding spare cleats for these is a challenge at most bike shops, and although they inspire fierce loyalty in those who use them, for a majority of riders there will be perfectly decent options available at a lower cost through one of the larger brands. 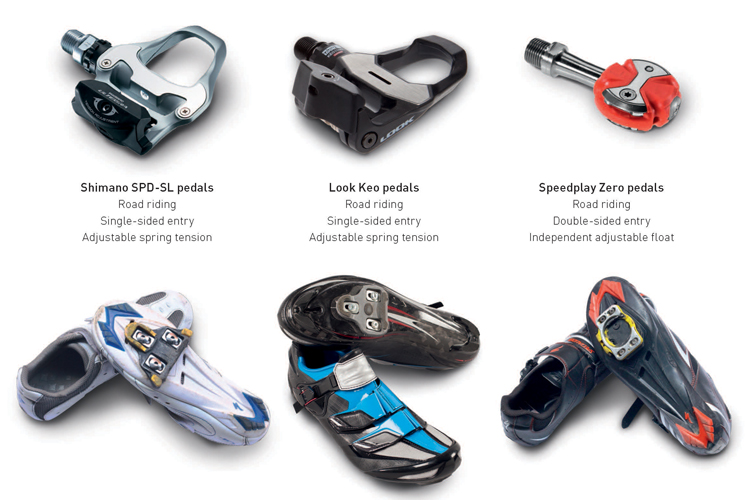
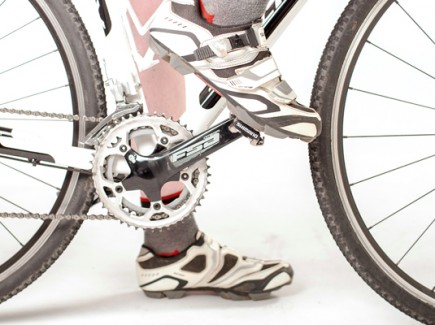
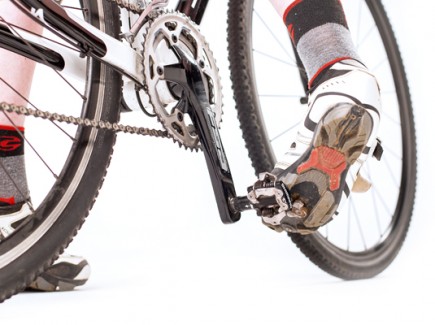
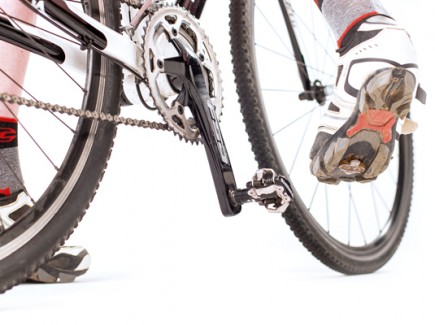
Road pedals
The French brand Look made the first commercially successful clipless pedal system, and it was designed for road bikes. Most road pedals have a roughly triangular shape, with single-sided entry, and have a wide surface area for maximum power transfer. To aid pedalling efficiency, the soles of road shoes are stiff, which enhances the transmission of energy into forward momentum. The best road shoes are carbon soled, and in many cases even have custom-moldable uppers to conform to the shape of the individual rider’s foot. Road pedals generally have an adjustable sprung binding at the back of the pedal. Attaching your foot to the pedal is similar to using ski bindings (on which they were first modelled), where you first locate the front of the pedal with the toe and then push down from the heel to engage the clip. The two most common systems are made by Shimano and Look, and both follow this basic system. Look road pedals are made out of composite or carbon materials, with a spring to tension the back of the pedal; this spring tension is adjustable on all but the two base models in the range. Cleats for this pedal offer different amounts of float (see glossary) for further customisation, and come in three different styles. Take care that you get the current generation Look Keo cleats, rather than the superseded (but still commonly stocked) Look Delta style, as they are not mutually compatible. Look’s position as a trailblazer in the commercialisation of clipless pedals for the road has meant that most brands on the market today have emulated the style, and attempts to move away from the three-bolt pattern have failed to find support from shoe manufacturers. Shimano’s ill-fated two-bolt SPD-R pedal system, which used a fiddly, multi-part metal cleat, has now been superseded by the three-bolt SPD-SL, which uses a one-piece plastic cleat and works in much the same way as Look’s models. Boutique brands such as Time and Keywin use their own systems which, while still having a similar basic shape, require fairly distinct cleats which may be difficult to buy. Brands such as VP and BBB offer copies of the Look Delta and Look Keo pedal styles – often of a high quality – that are compatible with the same cleats. Speedplay, a brand popular in European pelotons and with Australian bunch riders, offer something altogether different. In this lightweight interface, the pedal is dual-sided – hence less fumbling to click in at traffic lights – with the pedal a round lollipop-looking disc. The clipping mechanism is in the square cleat on the base of your shoe, which is attached with four bolts instead of the normal three-bolt style. Adaptors are provided to make it fit onto three-bolt pattern soles (that is, basically all road shoes). Speedplays are highly regarded by those with dodgy knees for the large amount of float and adjustment that they offer – up to 15 degrees – but the cleats are more prone to being affected by dirt and grit, and require regular maintenance. Most road systems are available in either 0 degrees of float (Look black, Shimano red) or 9 degrees of float (Look red, Shimano yellow). Shimano also offer a blue cleat, also with 9 degrees of float, which offers 11mm extra fore-aft adjustment. Look has a grey cleat with 4.5 degrees of float, which is the cleat that comes supplied with the pedals when purchased.
Going clipless
The transition to clipless pedals can be confusing and scary at first. Most riders have a harrowing tale of an early incident where they forgot to disengage their pedals when coming to a stop and took a slow-motion sideways tumble; luckily this early indignity is a good teacher! Soon, clicking in and out will become instinctive, and once the initial adjustment has been made, most riders are reluctant to return to a platform pedal or cage. Nonetheless, there are a number of tricks to ensure that your time with clipless pedals is a positive one.

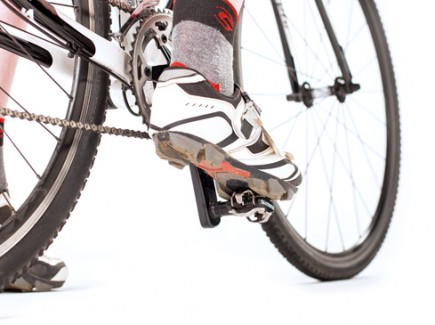
When you buy clipless shoes the cleats won’t be attached; because of the number of different styles of pedals available, cleats are provided with the pedals and not the shoes. The cleats must then be installed on the shoes, and their angle and positioning lengthways is variable to allow for different riding positions. For a majority of riders, the best cleat alignment is to point them directly ahead, however some people with knee problems will prefer a slightly ‘toe in’ or ‘toe out’ pedalling position, and will alter the cleat angle accordingly. Most riders position the cleat lengthways so that when clipped in, the ball of the foot (the widest part of the foot, behind your toes) is over the axle of the pedal. Personal preference is a factor here, but the float allowed in most cleats fortunately means that minor maladjustment in cleat position shouldn’t cause too many issues. If you’re unsure, or have pre-existing knee problems, it may be worth having your cleats professionally fitted at your bike shop. All but the most basic of clipless pedals provide scope for adjustment of spring tension – with the notable exceptions of Crank Brothers, which are non-adjustable, and Speedplay, which do away with springs altogether. In most cases, the tension is adjusted by a small 2.5 or 3mm Allen key bolt at the back of the pedal; adjusting clockwise will tighten the spring tension, and anti-clockwise will loosen it. It is usually a good idea to start off with loose spring tension, and as you build your confidence up in clipping in and out, the tension can be ratcheted up. If you find that you are pulling your foot from the pedal when accelerating, more spring tension is necessary, and if you struggle to engage the clip-in mechanism or find it hard to clip out, a softer spring tension will be of benefit. If you still find it challenging, investigate models like the Shimano Click’R SPD system or the lighter action Look Keo Flex and Shimano R540LA road pedals. When you’re not clipped in, the back of the pedal will tend to hang down, with the pedal lip at the top. To clip in, nudge your toes over the lip to hook the front of your cleat up and under it, then push down on the back of the cleat to lock it into the binding; you’ll hear a distinctive ‘click’ as it clips into place. To clip out, swivel your heel out away from the bike in a sharp, clean motion. Before heading out for the first time it is a good idea to practise unclipping while leaning against a wall, or in a doorway.
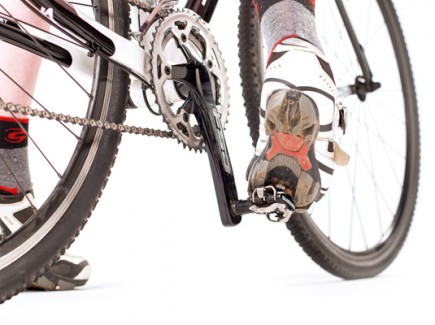
As for the actual mechanics of riding, the most important (and obvious) advice is to disengage one foot well in advance of coming to a complete stop, so you don’t get panicked and forget to click out. A good mental cue is to disengage one foot when you start braking for a traffic light. Some riders have a dominant leg, but if you don’t have any particular habits for what foot you push down on when starting off from a standing start, it’s a good idea to leave the right foot clicked in and remove the left from the pedal. This way, if you lose footing or slip, you will fall away from cars rather than towards them, and you won’t risk damage to your rear derailleur. When commencing from a standing start, a couple of strong pedal strokes will clear an intersection and move you away from the worst of the congestion if riding in traffic. Once you’ve got this little bit of extra space, you’ll be less frazzled and able to safely engage your foot in the pedal if you haven’t been able to get it completely in first time around. Don’t rise out of the saddle to accelerate until you’re confident of a steady footing or you have both feet engaged in the pedal. If your cleat slips on the wrong side of the pedal and you’re not sitting down, a swift and painful tumble onto the top-tube is likely. Also try to avoid looking down when clipping in or out; while looking down and being distracted there’s a chance you’ll ride into something ahead of you. It’s also important to keep an eye on the condition of your cleats, as they will wear down over a period of time. The recessed metal SPD-style cleats may last for several years, but the plastic road cleats will wear significantly faster as they are exposed. Expect to pay around $30 for replacements in either style. To prolong their life-span, it’s a good idea to swap them from one foot to the other when they’re about half-worn, as the foot that you click out at traffic lights will wear down quicker. There are usually wear indicators on the cleats to indicate when it’s time to replace them; if the cleats become too worn, you will have difficulty entering and exiting the mechanism, and even unpredictably pull your foot from the pedal altogether. Although it may seem an overwhelming number of things to remember at once, for most riders the use of clip-in pedals becomes a highly positive experience that transforms their riding experience for the better. With a bit of practice, those early nerves will become a distant memory – and a small price to pay for a greater affinity with your bike.
Glossary
Cleat A solid part that is bolted to the base of a clipless shoe, and which then clicks into the pedal’s binding. These are supplied with pedals, not shoes, and may require replacement as they wear. Float The amount of side-to-side movement there is when your shoe is locked into the pedal. Most pedals have a couple of different cleats available to allow for different degrees of float. Some riders prefer the more locked-in feeling that the fixed (0 degree) cleats offer, although these need to be installed millimetre-perfect or your knees may be injured. Spring tension The strength of the binding mechanism in the pedal. Reducing the tension will make clipping in and out easier, but if it is too loose the pedal may release while pedalling vigorously or pulling upwards. Ride On content is editorially independent, but is supported financially by members of Bicycle Network. If you enjoy our articles and want to support the future publication of high-quality content, please consider helping out by becoming a member.


Another advantage of going clipless is that you can easily do bunny hops – before that I kept trying and failing.
Within an hour of my first ride with clipless I was hopping over everything!
You’ll have so much more fun on your bike being able to easily and cleanly jump over rocks / pot-holes / drive-way lips!
You do loose some reactivity though with cleats. If you have to make a sudden significant change in direction you will loose your balance if you cannot stick a leg out in time to counteract the effect to some degree at least. You just dont have the time to unclip sometimes or the space needed to recover.
Bob, I agree there have been times I have had to quickly unclip. But I do not consider that a problem of cleats. Instead, it highlights a cyclist’s failure (yes, I’m admitting to my own failures!) to look and plan ahead to prepare for eventualities. The cyclist could also improve their balancing skill: keeping tucked in tighter, instead of flailing all over, would help with that.
Good article. Also to consider: clipless pedals can cause serious injuries in a couple of ways and it is worth people researching this before buying all of the kit. Knee and muscle injuries are common and so people need to research the proper position for cleats. James Wilson has a famous blog post on this at:
http://www.bikejames.com/strength/flats-vs-clipless-please-prove-me-wrong-why-i-wont-let-it-go/
Physical injury from falling off clipped is also worth considering. I have a 3 inch scar from that myself.