Do you use a hook turn to turn right? It’s a great risk-reduction tool for riders, Simon Vincett explains.
Moving to the middle of the road to turn right is a nerve-wracking situation for many bike riders but fortunately it can be mostly avoided. The answer is a hook turn.
Hook turns are familiar to Melbourne road users, being a manoeuvre employed by motor vehicles to stay out of the way of trams, which occupy the middle of the road. To those outside Melbourne, hook turns seem counter-intuitive and, therefore, confusing. But they’re easy when you know how.
While drivers can only use a hook turn where it’s signed as permitted, bike riders can use them anywhere, unless a sign forbids them. The advantages are that you can keep left throughout the manoeuvre and you don’t have to indicate, cross into the middle of the traffic lane or cross multiple traffic lanes, or sit waiting in the middle of an intersection for a gap in oncoming traffic to become available.
The disadvantage is that it takes two stages to complete the turn. Another potential disadvantage is that other road users may not know what you are doing or that the hook turn is legal for bike riders. The solution here is to ride confidently, knowing that you are in the right and, moreover, that you are doing the best thing for traffic flow as a whole. If you’re uncomfortable with a particular situation, however, you can always pull off to the footpath, dismount and walk through the intersection as a pedestrian.
Let’s trace the process in a couple of scenarios.
Hook turn at a crossroad with traffic lights
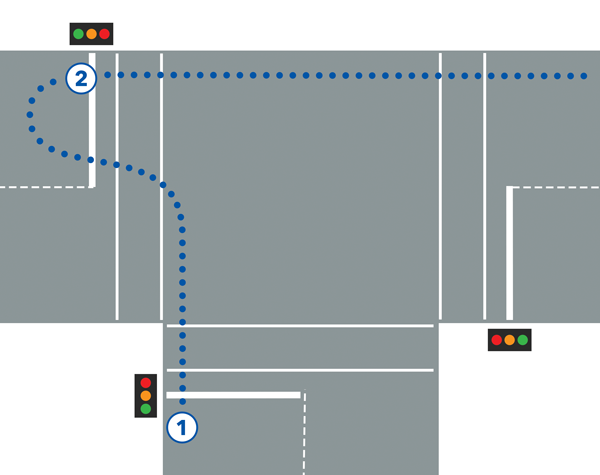
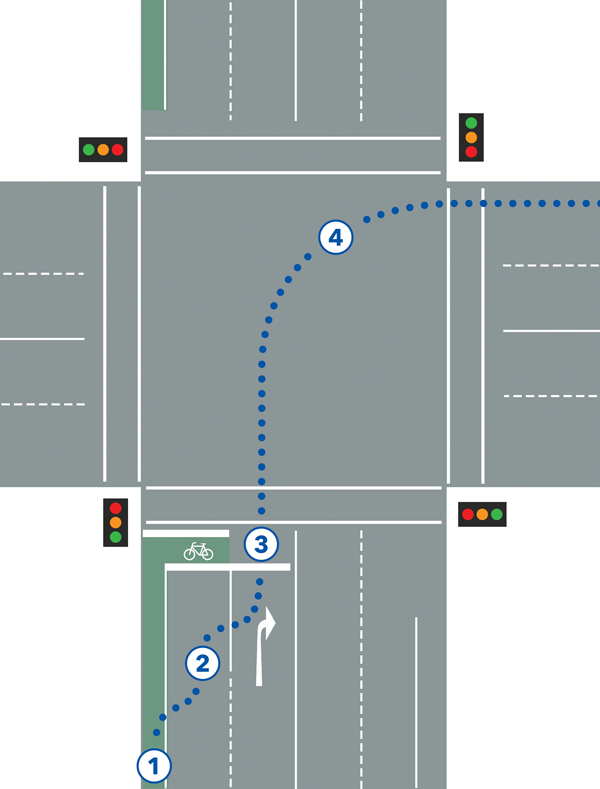
(diagram 1) As you approach the intersection (1) stay in the bike lane or to the left of the left lane if there is no bike lane. If the light is green, continue in that same line as if you were going straight ahead. At the centerline of the crossroad, give way to pedestrians and then turn left into the bike box of the crossing road. (2) Stop and turn your bike to face the direction you will continue in. If there’s no bike box, set yourself up in front of the line of traffic as if there was a bike box. Overlap the pedestrian crossing if necessary but be aware that you must give way to pedestrians. Move on when the light turns green and will complete your right turn.

In the first stage of this turn, it’s important to ride straight ahead until the centerline before moving left into the bike box. If you move left too soon other traffic might think you are turning left and try to turn left around you.
Be careful when selecting a location in front of the cross road to position your bike, check you are in front of the lane heading in the direction you are intending to travel in and not in front of a left filter lane—if possible check arrows on the road on multi-lane roads to ensure you are in front of the forward travelling lane.
(diagram 2) This hook turn process also works at a T-intersection with traffic lights and at a crossroad with a stop sign in place of the traffic light.
The hook turn works less well for a give way sign (diagram 2.5), because the traffic tends not to slow down as much. In the case of a give way sign, look for pedestrian crossing lights or a good spot mid-block where you can pull over (4) and cross as a pedestrian (5).
Hook turn to a right side street
(diagram 3) The hook turn is also handy when you are turning right into a side street from a main road. Rather than stopping in the middle of the road waiting for a break in on-coming traffic, a hook turn allows you to (1) pull over to the left and wait more comfortably. The downside is that you then have to give way to traffic in both directions before crossing (2) to complete your right turn.
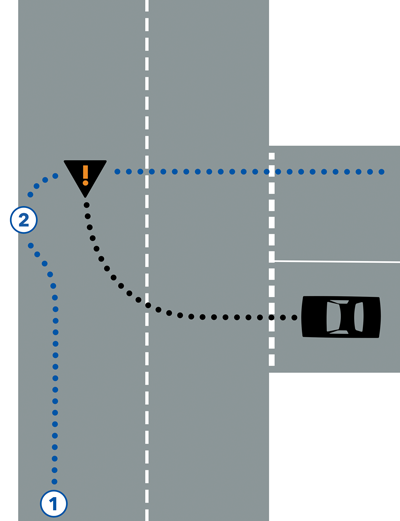
You will also need to give way to vehicles that are turning right out of the side street. This is despite the fact that they would have had to give way to you if you had turned right from the middle of the main road. It is necessary to give way because the driver turning right from the side street is unlikely to understand that you are making a hook turn and, therefore, will not give way to you.
Right turn from a side street (without traffic lights)
(diagram 4) When you’re the one turning right from the side street, it’s a standard right turn that you use. This requires you to take the lane and to indicate.
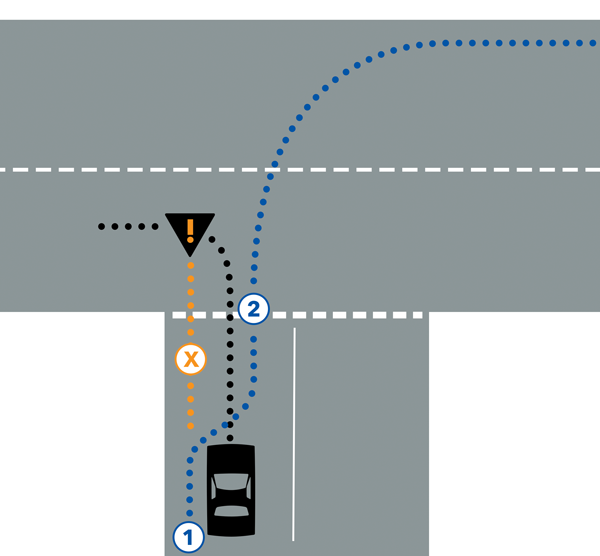
So, at least 25 metres out from the intersection you need to check behind you (1) and, when the way is clear, indicate and move out from the left side of the lane to the middle of the lane. Then you need to indicate for a right turn and stop at the intersection (2), or give way if it’s signed as give way.
It’s important that you occupy the middle of the lane so that another vehicle doesn’t pull up beside you and turn left across your path. When the cross traffic is clear you can turn right into the bike lane or the left-hand side of the main road.
Right turn from a right-turn lane with a signal
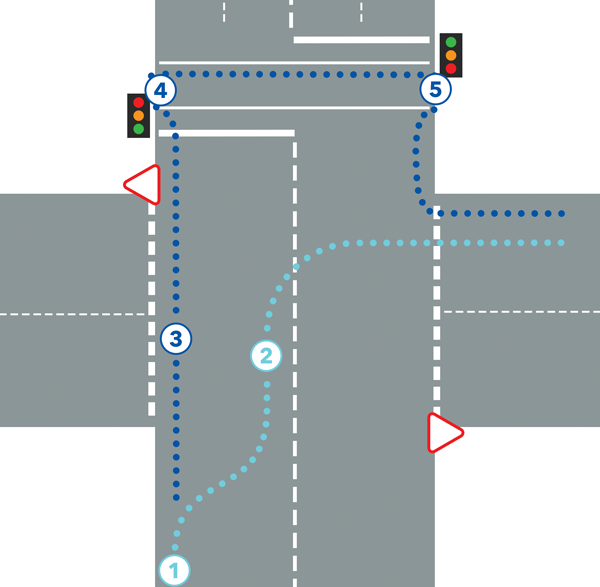
(diagram 5) Traffic lights that include a right-turn arrow actually work well for bike riders. The right arrow only shows when the other signals prevent any other traffic from crossing your path. The proviso for using a right-turn lane is that you have to change lanes to access it and you have to hold that lane and take you turn with confidence.
At 50 metres from the intersection you need to check behind you (1) and, when the way is clear, indicate and move out from the bike lane or left side out into the middle of the lane (2). Then you need to indicate and slip into the right-turn lane. Stay in the middle of this lane (3) to wait for the green arrow. When the green arrow shows you can turn across to continue (4) in the bike lane or the left of the lane.
Veer right at a forking road
(diagram 6) Thankfully these aren’t too common, because they can be a bit nervy for all road users. Usually the approach lanes are marked with painted arrows on the ground as ‘straight-ahead only’ or ‘veer-right only’ or ‘straight ahead and veer right’ showing what manoeuvre you can perform from the lane. Most probably you will need to be in the right lane to veer right.
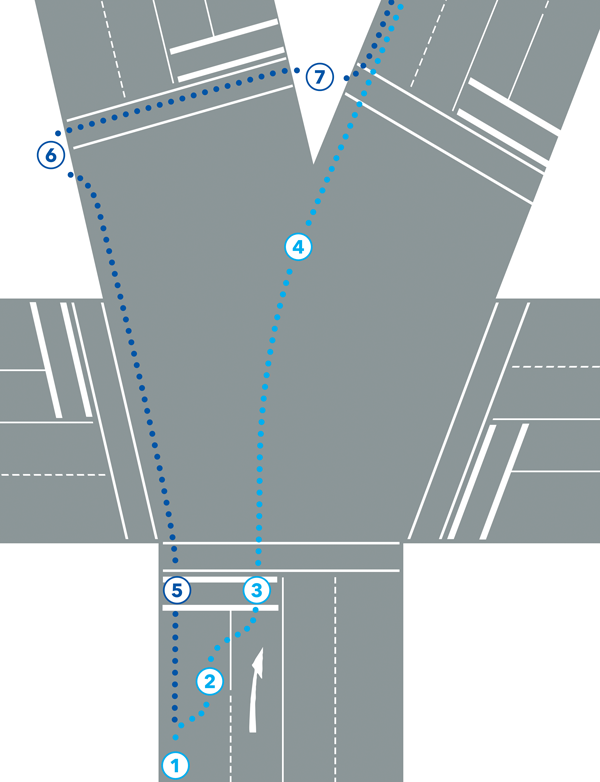
At 75 metres from the intersection you need to check behind you (1) and, when the way is clear, indicate and move out from the bike lane or left side out (2) into the middle of the left lane. Then you repeat this process—check behind you and, when the way is clear, indicate—and move into the right lane (3). Stay in the middle of this lane to proceed through the intersection (4) or wait for the green light. When through the intersection, you can move back to the bike lane or the left of the left lane.
If this is a way you travel frequently, you might look for a way to avoid such an intersection by taking a different route. If there are pedestrian crossings on the intersection, you can choose the much more comfortable ‘Option 2’ of crossing as a pedestrian. In this process you can keep to the left through the intersection (5), dismount at the crossing and cross with the pedestrian light (6), and remount and ride on in the direction you want to travel (7).
Ride On content is editorially independent, but is supported financially by members of Bicycle Network. If you enjoy our articles and want to support the future publication of high-quality content, please consider helping out by becoming a member.