

Bottoms up
Iain Treloar investigates the mysterious, often bamboozling bottom bracket.
Illustrations: Karl Hilzinger.
There are few parts of the bicycle more mystifying than the bottom bracket, hidden away in the base of the frame. For the vast majority of your riding, you won’t even notice it—it should just get on with the job of allowing your cranks to spin—but a worn or dirty bottom bracket is a noisy bottom bracket, and eventually it will make itself known. With annoying clicks and creaks, the bottom bracket is very often the culprit.
Where it gets confusing is that there’s a whole lot of different types of bottom bracket, which can make buying and fitting a new one a hassle, to say the least. It’s time to remove some of the mystery—here’s an overview of the many, many types of bottom brackets.
Back in the day…
Older readers may remember the days of cottered cranks, which held crank arms onto a bottom bracket spindle. Those same readers may well remember their cranks falling off mid-ride. In a bid to simplify this clumsy system, the Ashtabula, or one-piece crank, was born—a single curving piece that wove through the bottom bracket shell on the bike, incorporating both cranks and the spindle.
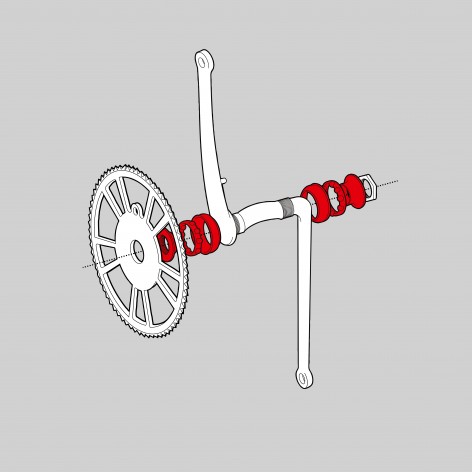
Fig.1 – Ashtabula
This system was easy to service and simple to understand—it’s a style of crank that can still be found on most 12” and 16” kids’ bikes, department store bikes in a box and cheaper BMXes. Happy days, you might think? Well, not quite. Unfortunately, this bottom bracket standard is also heavy, ugly and not terribly efficient, which meant that the bicycle industry started looking into the development of alternatives, leading to today’s virtually impenetrable mess.
The next step in the evolution of the bottom bracket was when the one piece crank was replaced by a separate square-taper bottom bracket spindle, onto which the cranks were mounted. Surrounding the spindle was loose ball bearings, on which the bottom bracket spindle (and in turn, cranks) rotated. This was all contained by cups that threaded into the frame, forming a protective barrier. Seems pretty straightforward, if you say it quickly.
Fig.2 – Square taper bottom bracket (non-cartridge)
Unfortunately it’s not quite as simple as all that; the servicing of this system was quite labour-intensive, and ball bearings are so passé in comparison to a sealed system.
Cartridges
The cartridge bottom bracket was the next step in the evolution of the bottom bracket, enclosing square-taper spindle, sealed bearings and cups into one finely engineered chunk that threads into the bottom bracket shell of the frame. Being a sealed system, it’s not particularly serviceable, but should last longer than its antecedents. For simplicity of form and lack of confusing parts, it’s pretty neat.
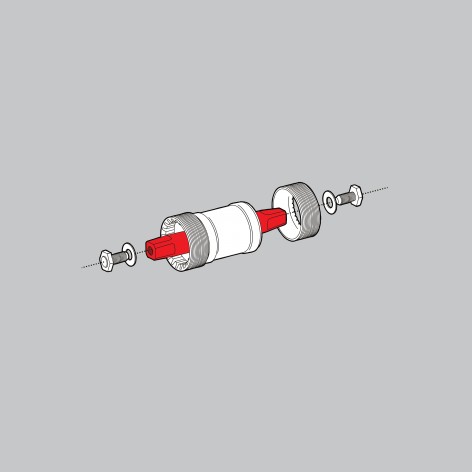
Fig.3 – Square taper (cartridge)
Only problem is—this system isn’t just one system. To keep mechanics on their toes, there are two common threadings of bottom brackets—Italian and English—with a few other far less common variants of other nationalities muddying the waters … and they don’t play nicely with each other.
As a general rule of thumb, English threading is much more common, but if you’ve got a Pinarello, Bianchi, Colnago or other Italian brand, it’s most likely running an Italian threaded bottom bracket. Therefore, you’ll need to know not just the width of the bottom bracket shell (70mm in Italian, or for English thread, either 68mm or 73mm depending on if you’ve got a road bike or a mountain bike)—which should in turn signal the thread type—but also the length of spindle that you’ll need running through the middle.
The good news is that if you’re replacing a cartridge on an existing frame, the relevant measurements will be printed on the bottom bracket already installed; you just need to get it out to work out what it is. If you’ve only got the frame and no idea of its provenance, good luck, and remember the local bike shop is your friend.
There are also two different sizes of square taper spindles—ISO and JIS—but they align fairly closely with the bottom bracket types, so if you’ve gotten this far it’s unlikely to trip you up. The slightly smaller ISO is mostly on European bottom brackets (i.e. Campagnolo and a couple of others), while the larger JIS will suit the substantially more common Shimano (or Suntour).
The square taper system, however, isn’t completely without flaw. If the crankbolts aren’t kept adequately tight, the cranks have a way of working themselves loose—rounding out the square hole on the cranks, or the spindle, or both.
From Octalink to external
Not to worry, because it wasn’t long before Shimano developed the Octalink system, introducing yet another alternative into a market that wasn’t exactly short on them. The Octalink system—which replaced the square taper with an eight-splined spindle—is better at transferring power, making it appealing at the upper end of the market.
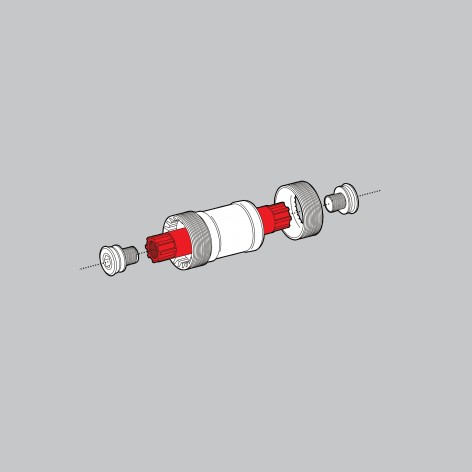
Fig.4 – Octalink bottom bracket
Competitors of Shimano were peeved at this leap forward, and soon developed a ten-splined alternative that was similar enough to get all the mechanical benefits but different enough to avoid a lawsuit. This system is called ISIS, and it’s still commonly available through brands including Truvativ and Raceface.
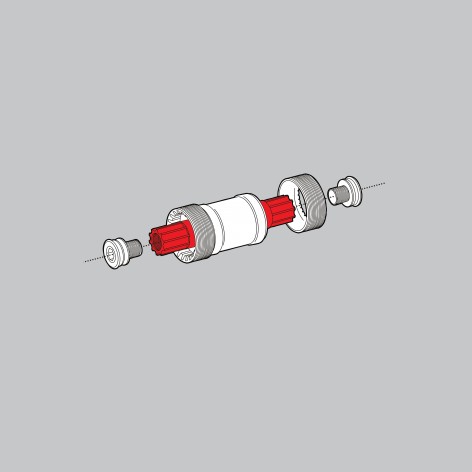
Fig.5 – ISIS bottom bracket
But wait, there’s more.
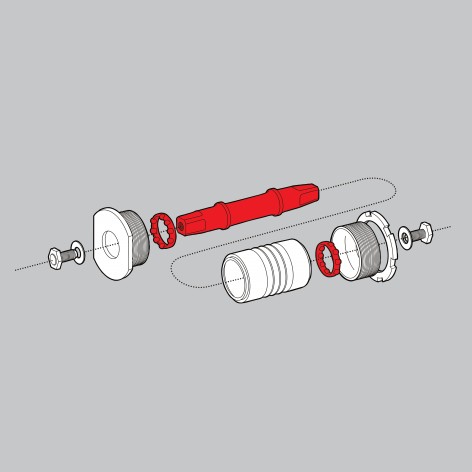
Although the Octalink and ISIS systems are still popular, there was more development to be done. The next step was external bottom brackets, which move the bearings out from inside the bottom bracket shell of the frame.

Fig.6 – External bottom bracket
This equals larger bearings and space for a thicker spindle, which in turn means an increase in both stiffness and strength. There are a number of different variants of this style, including (but not limited to) Shimano’s Hollowtech II, Campagnolo Ultra-Torque (with a splined, symmetrical spindle split in the middle), SRAM and Truvativ’s GXP, and FSA’s MegaEXO. They do the job nicely. But since when has that been ample reason to slow the flood of innovation?
Pressed into service
It’s here that we say hello to press-fit bottom brackets. With these, instead of threading into the frame, bearings are pressed into the frame, and the spindle is attached to the drive-side crank, fastened in place on the non-drive side by the other crank. This was quite a radical change, in that the bottom bracket shell of the frame wasn’t just threadless but completely redesigned to be larger in size as well. The most widely-known of these systems is known as BB30 (30 referring to the diameter in millimetres of the crank spindle – 6mm bigger than what was possible with external bottom brackets).
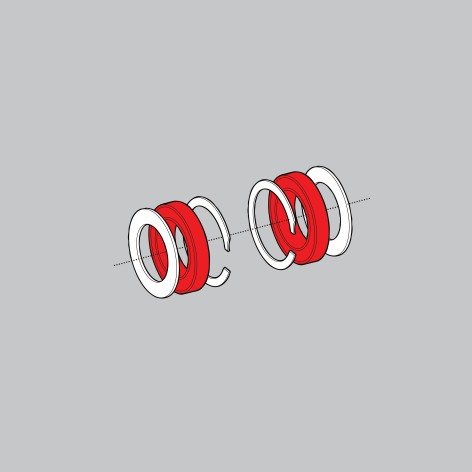
Fig.7 – BB30
In many ways this seems like an elegant solution. In many ways it actually is. Press-fit bottom brackets are long lasting, and—according to experienced Melbourne mechanic Ben Thomson (benthebiketech.com.au)—“they’re incredibly well sealed. Provided they are looked after, there’s no reason why you can’t get years of solid use out of them”.
That said, there are two major problems with press-fit systems. The first is that they assume extremely tight manufacturing tolerances, because even a hint of variation in the size of the bottom bracket shell means that you’ll be dealing with a creaky bike, and no easy fix.
The second is one of identification. Put simply, there’s a mind-boggling variety of press-fit bottom brackets on the market which, Thomson explains, “can easily cause confusion for the inexperienced and uninitiated. It’s not uncommon for me to have arguments with even other mechanics or reps regarding identification of different shells and systems”.
To give you a fleeting overview of the tangled web of different standards, consider this. Since Cannondale released the BB30 system in 2000, just a few of the more common (but subtly different and, crucially, incompatible) press-fit alternatives include:
- PF30 (which sounds a whole lot like BB30, but is actually 4mm bigger at the frame shell)
- BB86 and BB90 (yet more different frame shell sizes, used by Trek, Giant and Scott—the measurements here refer not to the spindle diameter, which is actually a conventional 24mm spindle, but the width of the bottom bracket shell)
- BBright and BBright PF (42mm and 46mm frame shells respectively)
- BB386EVO (basically a wider BB30)
And plenty more besides.
Should this sound nightmarish (which it kinda is) there’s a small ray of hope in the fact that adaptors are produced by companies like PraxisWorks and Problem Solvers which allow some cross-compatibility—for instance, if you get a new BB30 frame, but want to install a non-BB30 crankset. These are essentially an industrial plastic or alloy sleeve (with or without bearings installed) which press into the bottom bracket shell, shrinking it down to fit the smaller spindle of a GXP (SRAM) or Hollowtech II (Shimano) crank. However, whilst they’re economical in saving you from buying a new crankset, they add an interface that could result in squeaks and creaks; for this reason it’s generally better practice to match the crankset to the bottom bracket format the frame is designed for.
If this is all a little overwhelming, don’t fear. Most of the time the bottom bracket—in all of its permutations—will just spin away in blissful silence. And when they eventually stop doing so, hey, at least you’ve got this super fun article to read.
Ride On content is editorially independent, but is supported financially by members of Bicycle Network. If you enjoy our articles and want to support the future publication of high-quality content, please consider helping out by becoming a member.


Thanks Iain – A great article with a lot of very useful information for those of us amateur bike mechanics who like to have a crack at repairs ! !
Many thanks,
Ed
Happy to help Ed, glad it was useful!
I have a Jamis road bike with FSA SLK Light bb30 cranks. I will keep this 53/39 set until after the 210km Around the Bay ride in October. I will then change it for a compact 50/34 ultegra bb30 crank set. This requires an adaptor. I have that. Your excellent article somewhat puts me at ease in making the changeover my self.
My favourite ride has TruVativ Power Spline : yet another variation with 12 spline interface.
https://en.wikipedia.org/wiki/Bottom_bracket