

Strong, lean riding machine
Strength training will help keep you young, healthy and improve your riding. Exercise physiologist Vanessa Lougoon has developed a strength routine suitable for everyone.

Are you one of the many riders with super-strong legs but puny arms? Can you ride for hours but are barely able to do one sit up? Many riders have good cardiovascular fitness but low muscle strength. Numerous studies have shown that strength training can significantly improve your cycling, reduce injury risk and help you maintain good posture and strong healthy bones.
If you have a fair few birthdays under your belt, strength training is even more important. After about 60 years of age, age-induced muscle wasting, called sarcopenia, contributes to a reduction in muscle mass and strength. However, recent studies show that inactivity has a significant role in muscle wastage, loss of bone density and loss of strength. Regular strength training exercises can combat weakness by building muscle strength mass and preserving bone density. In addition, strength training also has the ability to reduce the risk of osteoporosis and many numerous chronic diseases such as heart disease, arthritis, and type 2 diabetes, while also improving sleep and reducing depression.
The following program requires no equipment, enabling you to train at home, at a local park or in a hotel room for business or holiday travellers. The program may be performed two to four times per week for 30–45 minutes.
Quality is the key to any strength program so focus on the following points for every exercise that you perform. Initially, this might require a bit of concentration but it will eventually become automatic and will serve to maintain good posture, promote good technique and minimize risk of injury.
- Activate the lower abdominals by drawing your belly button towards your spine, and tilting your pelvis into neutral position (approximately one hand width of a gap at lower back);
- Point shoulder blades ‘back and down’ to relax shoulders and activate scapula stabilisers (between shoulder blades).
Complete a ten minute warm up and cool down routine.
If you cannot complete the desired repetition with good form, stop the exercise and build over time. Each exercise listed has an alternative once you are competent at the beginner level.
Split Squats

Objective: To strengthen your hip flexors, quads and improve balance.
From a standing position, step forward with either leg, approximately your leg length in distance. Keeping a good upright posture, drop down slowly until your back thigh and front shin are perpendicular to the ground, without your knee touching the ground. Adjust back foot if necessary. Push up to the start position and repeat desired repetitions before switching legs. Perform 2–3 sets of 12 repetitions on each leg.
Coaching Keys: Knees should be aligned with the middle toe and hips are kept level and squared. If you cannot maintain good technique, only drop down as far as you can maintain good form. Keep weight evenly distributed between front and back feet. You should feel it in your quads, glutes and hip flexors.
Too easy? Perform the exercise with your back foot on a bench or step.
Alternating single leg raises
Objective: Improve stabilisation of the deep core musculature including the transversus abdominis, the deepest abdominal muscle; the multifidus, the deep muscles along the spine; the diaphragm, the large breathing muscle; and the pelvic floor.
Lay on your back with your knees bent at 90° with feet flat on the ground. Place your hand under your lower back, directly below your belly button. Take a deep breath in, then exhale and draw your belly button inward toward the spine as you gently tilt the pelvis towards the rib cage until you feel firm pressure on your hand. Hold this position and breathe normally. Keeping your knees bent, lift one leg so that the thigh is perpendicular to the ground and gently lower. Alternate legs and repeat. If this is too difficult, lift the leg in smaller increments. Alternatively, increase difficulty by progressively straightening legs. Perform 2–3 sets of 12 repetitions with each leg.
Coaching keys: Maintain the curve in your lower back throughout the entire movement and keep your neck, shoulders, arms and resting leg relaxed. You should feel it in your lower abdominals.
Too easy? Try alternating single leg drops. As above, but start with feet off the ground and the thighs a 90° angle from the body. Lower alternating legs to touch the ground. Increase difficulty by straightening legs.
Bridge

Objective: To develop and improve activation of glutes (butt muscles).
Lie on your back with knees bent at 90° and heels only on the ground. Arms are relaxed to the side with palms facing up, or across your chest.Lift hips up and off the ground until a straight line is formed from shoulder to knee. Hold for a moment, return to the start position and repeat. Perform 2–3 sets of 12 repetitions.
Coaching Keys: Make sure your glutes are activated. If you feel a strain in your lower back, ensure your pelvis is tucked in the neutral position. You should feel it primarily in your glutes with some activation of hamstrings and lower back.
Too easy? Lift one leg straight up. Ensure you keep hips level and squared throughout the movement. Perform 2-3 sets on each leg. Build up to 12 repetitions.
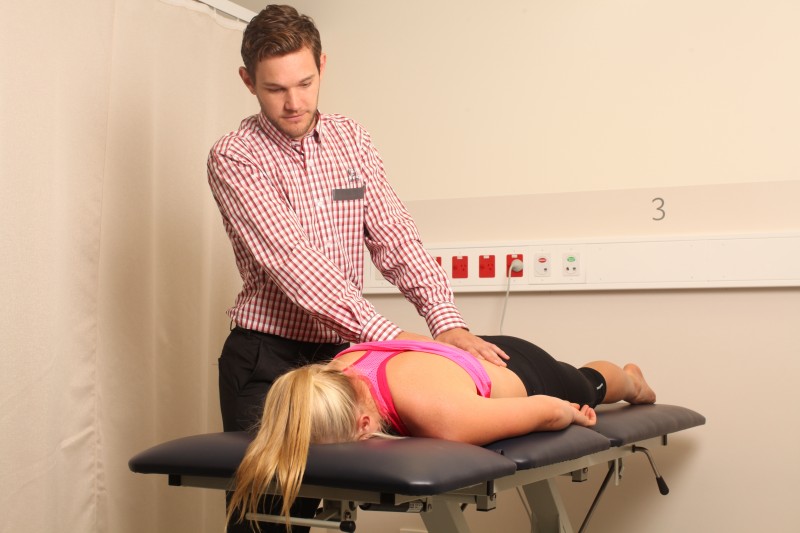
Side bridge
(pictured above)
Objective: Develop strength in the obliques (lateral abdominal muscles).
Lie on your side with your forearm on the ground and elbow under the shoulder. Knees are bent at 90 degrees. Push hips up off the ground, until your body forms a straight line from the head to the knee. The inactive arm rests at your side. Perform 2–3 sets of 20 second holds each side. Build up to 60 seconds.
Coaching Keys: Keep the body in a straight line, both from the front and side views. If there is too much strain on your supporting shoulder, bring that elbow closer to your body until it is more comfortable. You should feel it in your obliques (side of torso).
Too easy? Raise your hips higher so your knees are off the ground.
Prone Shoulder Circuit: T, W & L’s

Objective: To improve shoulder stability, scapular strength and muscle recruitment patterns.
Lie on your stomach with arms out to the side. Lift your arms off the ground with thumbs pointing toward the roof, so your body forms a T position. Hold for two seconds. Move arms into a W (bent elbows) position and hold for two seconds. Bring your elbows in closer to the sides of the body so your arms are in an L position. Hold for two seconds. Repeat the circuit. Begin with 2–3 sets and work up to 12 repetitions.
Coaching Keys: Keep head aligned with the spine by lifting off the ground and tucking in chin. Ensure that when you are in the T position that you pull your shoulders away from your ears so that you do not overuse the shoulder muscles. You should feel it between the shoulder blades.
Push Up

Objective: Improve upper body strength and stability.
Lie on your front with body straight, chin tucked in and hands placed in line with and next to the shoulders. Arm angle should be approximately 45° from the body. You can perform this from the knees or feet. Push up until your arms are extended. Lower down as far as you can while maintaining good technique and repeat. Aim to lower body on a count of three and push up on one count. Perform three sets and build up to 12 repetitions.
Coaching Keys: Keep your body straight for the entire movement. You can adjust your hands wider or lower for comfort. If you are struggling to keep proper form from your knees, you can perform these standing against a wall. You should feel it in your upper body, arms and abdominals
Too easy? Once you can perform 12 repetitions from your feet, try with one arm (from your knees). Ensure you keep your body aligned straight.
Vanessa Lougoon is an accredited exercise physiologist and high performance consultant. She specialises in injury management, athletic preparation and chronic disease management through exercise and lifestyle intervention. inspiredperformancetoday.wordpress.com
Ride On content is editorially independent, but is supported financially by members of Bicycle Network. If you enjoy our articles and want to support the future publication of high-quality content, please consider helping out by becoming a member.


This is exactly what I needed. Thanks heaps and thank you for using a model with proper tan lines! 🙂
I think the photo of the side bridge at the top of the page refers to an exercise further down? Also I have an inactive ACL in one knee and severe arthritis in the other so the side bridge pictured is not possible for me- the bones slide in my ACL affected knee and it just hurts too much in the other. Alternatives?
Hi Robyn,
As an alternative to the side flexion, I suggest ‘Lateral Trunk Flexion – with dumbbells.’ This can be performed standing, or sitting if there is discomfort in your knees. Simply stand (feet approx hip distance apart) and hold a dumbbell only in one hand. Slide this hand down the side of the leg as far as you can, return to the start position, then slide the opposite hand (i.e. without dumbbell) as far as you can, then return to the start position. Repeat up to 12 repetitions before swapping hands with the dumbbell. Ensure you maintain a pure lateral movement AND keep your hips level and lower body stable throughout the entire movement (swaying of the hips will take away the emphasis of the obliques).
Hope this helps 🙂
Vanessa
Thank you Vanessa