

Diagnosis 101
What does that rattle mean? How do I know if my chain is haddit? Learn the diagnosis techniques of pro mechanics to understand your bike’s state of health.

While you might not feel confident to replace the bearings in your bike’s headset, it’s good to know if they are OK or need to be seen by your mechanic. There are a few tricks you can try to test other parts as well, in addition to developing a habit of checking bolts are all tight.
If you remove a bolt or part (which is a good idea because you can clean it) put some bearing grease on the thread or contact surfaces to make them easy to take apart next time. That includes pedal threads and the seat post.
What you need
An hour or two
Maintenance stand OR rope tied to a rafter to suspend your bike off the ground
12 inch ruler OR chain checking tool
Set of Allen keys (sizes 4, 5 and 6mm)
Bearing or thread grease
Chain lubricant
Headset
Wear in the headset can be determined if you have the bike set firmly on the floor, put the front brake on and rock the bike back and forth. If there’s any play in the headset bearing they will feel loose and rock back and forth. You can also pick the front wheel off the ground 10cm and drop it to listen for a loose, rattly headset.

A more sensitive test is to stand over the bike with light weight on the seat, grip the handlebars and lift the front wheel a little off the ground and turn them 90 degrees (or close to it if you’ve got drop road handlebars). Then try to rotate the bars fore and aft (or up and down). Any looseness in the headset bearings can be felt and heard.
When you lift the front wheel off the ground slightly the handlebars should turn smoothly. If it is rough or hard to turn the headset is too tight or the bearings are in need of some grease. If the handlebars want to stay in one spot, usually facing straight ahead, the bearings are probably brunelled or worn into indentations inside the headset. These need to be replaced so the handlebars turn smoothly.
Wheel hubs and bottom bracket
The bearings in the bottom bracket (they support the axle between the pedal cranks) and the bearings in the hubs that support the wheel axles degrade over time due to various factors.
The quickest way to check if hubs are worn is to pick the front or back wheel off the ground and give it a spin. If the wheel doesn’t spin freely and for a long time that indicates the hub is too tight. While it’s spinning, gently hold the fork or seat stay. You should be able to feel if the hub is rumbling while it rotates, which indicates wear.

For more precision, take the wheel out of the bike, hold it by the axle bolt (or skewer for qr wheels) and spin the wheel. Bearings requiring attention can be felt as notchy-ness or drag as the wheel rotates.
Now with one wheel held up off the ground, grab opposing sides of the wheel and jiggle the wheel back and forth. You’re feeling for play in the hub. If there is play the cones in the hub are loose and will have to be adjusted and possibly replaced.
To check the bottom bracket bearings, give the pedals a spin backwards. They should run smoothly. If they’re stiff it can mean the bearing inside has become dry. To be sure, take the chain off the chain rings at the front (generally selecting the small chain ring then deliberatly de-railling off the inside by hand is easy enough) and hold it clear of the chain ring. Rotate the cranks with gentle use of one fingertip on the crank arm – like changing the time on an old fashioned clock! This will let you feel any notchy-ness in the bearings or tight spots in the rotation.
Modern bikes will have a sealed bearing units meaning there’s no adjustment to be made – they are a replaceable unit. Wear can be detected by grabbing each crank arm, jiggling them from side to side and feeling for any play. Kids’ bikes and really basic bikes will still have an adjustable bottom bracket, in which case they can be dissembled, new bearing installed with new grease and they back in action.
Drivetrain
The drivetrain – chainrings, front derailleur, rear derailleur, rear cogs and the chain – is the part of you bike they wears out fastest. Like brakes, the derailleurs operate with cables. Put your bike on a maintenance stand or securely suspend it. While rotating the pedals change the gears through all the combinations. Any dragging, skipping or rubbing indicates adjustment is required. If there is too much friction in the cables you can try running some lubricant into them but they probably need replacing. Cables with minimal friction have a lighter action at the lever, shift the derailleurs more easily and make you riding easier and more enjoyable.
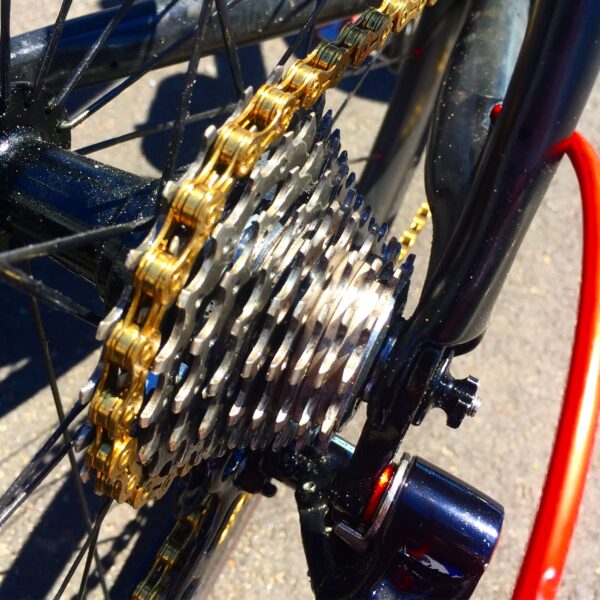
Check for wear on the teeth of the chainrings and the cogs. The teeth should be symmetrical on either side, not wave shaped. The fastest wearing item of the drivetrain is the chain. As you ride grit builds up inside the bushings, which grinds away the pins between each link, effectively stretching the chain. It’s a fairly narrow margin of acceptable wear on chains – just .75 of a percent.
Fortunately chain wear is quite easy to measure with a 12 inch ruler. All bicycle chains are a half-inch pitch, meaning the links are half an inch in length from pin to pin. Therefore, a 12 inch ruler should measure 24 links. If your chain measures 12 and one 1/8 inches or longer you’ve surpassed the range of acceptable wear. After this degree of wear, the chain, and usually the cassette of rear cogs, needs to be replaced.
Nuts and bolts
Loose bolts cause rattles and rattling causes parts to wear out or possibly break. All your contact areas – handlebar, stem, seat and pedals – have to be secure before your head off down the road. Allen keys in the common sizes of 4, 5 and 6mm are all you need to check the bolts securing these are tight. They should be snug – you don’t have to get too carried away.
Also check the bolts attaching the front and rear derailleurs and the chainrings. Brake mounts can shudder and rattle if they aren’t tightly fastened so check these and also the cable anchor bolts. Inspect the attachment of racks, baskets, bottle cages, locks and also the smaller items such as lights, computers, bells and reflectors.
Have you checked every bolt now? A bolt you shouldn’t over-tighten is the cap of the steerer, which comes up through the frame from the forks. This bolt should be just snug and over-tightening it interferes with your steering and wrecks the headset bearings. The pedals probably fasten with a 15mm spanner. However, these self-tighten with pedaling so if you can’t undo them with your fingers they are already tight enough.
Of course the quick release levers have to be secure as well. The seat post clamp must be tight and allow not twisting of the post inside the frame. The wheel quick release skewers should close up against a frame member, not down or back, and be closed just tightly enough that they leave a slight impression on your hand. Tightening skewers too tightly can strip their threads.
Frame inspection
Though it’s unlikely to be making a noise, it’s well worthwhile inspecting the condition of the bike’s frame while you’re tightening bolts. Look closely at the main tubes, making they are in good condition. Inspect the welds, especially the lip of the weld where you may get a stress fracture. If you’re in any doubt, it’s best to take the bike to a shop where they can determine if it’s a scratch in the paint or a crack. Stress fractures are very uncommon but they can happen.
Other noises
Brakes can squeak if the braking surface of the brake pad or the wheel rim is too worn and glassy. They might also squeak if the pads aren’t toed in, meaning they are slightly angled so that the leading edge of the brake pad contacts the rim slightly before the rest of the pad.
Pedals have bearings that can become dry and wear out to cause squeaking or knocking. Unfortunately, pedal bearings are sealed cartridges and are not repairable. You can try running some chain lubricant in between the moving parts.
Thanks to Brian Lacey for feedback to the magazine article that has contributed to this version.
Ride On content is editorially independent, but is supported financially by members of Bicycle Network. If you enjoy our articles and want to support the future publication of high-quality content, please consider helping out by becoming a member.


I disagree with your advice on assessing chain wear. The best thing is to get yourself a precision measuring device like the Rohloff Caliber 2. These are cheap and allow you to accurately measure chain wear in a few seconds without removing the chain. I would also advise changing your chain when the wear reaches 0.075 mm per link (about 0.3 per cent assuming it’s per full link).
This is a lot less than the 1/8 inch for 12 inches (more than 1 per cent) but although it means you will go through more chains you will not need to change the cluster every time you change the chain, things will run a lot smoother and your chain wheel and other parts of the transmission will last a lot longer too.
Steve Yates
Perth, WA
Letter to Ride On
You go through an awful lot of chains doing it that way. This might be ok for a 10 or 11 speed system, but for an old 5,6,7 speed system then 1% elongation (not “stretch”) is acceptable before it all starts going wonky.