

Better Biking: How To Measure Stack And Reach
Bicycle sizing is, to the uninitiated, a confusing blur of figures and angles. Here in this informative article Iain Treloar shows you how to make sense of it all.
What any bike rider seeks is the moment where the bike disappears—where any niggles evaporate into the ether, where body and machine are perfectly attuned, and where that elusive state of flow is attained. The key to this is a bike that fits correctly. But finding the right size on a new bike, or achieving comfort on an existing one, can be a complicated and challenging process. Being able to interpret geometry charts and understand why one bike fits differently from another helps light a path through the quagmire.

Some brands size their bikes like T-shirts—small, medium, large. Others (more commonly on mountain bikes) use imperial sizing—17”, 19”, 21”. On road bikes, sizes are usually specified in centimetres—50, 52, 54, 56cm and so on. Complicating things further, the nominal size of any bike can mean very different things from one brand to the next. If you’re comparing a race geometry road bike from Bianchi to a Giant, for instance, an effective medium-sized frame is in Bianchi’s sizing labelled a 55cm, in Giant’s sizing a 47cm. Bianchi’s sizing is taken from an imagined seat-tube length (what Bianchi call a 55cm is actually 52cm in that dimension); Giant have a radically sloping top-tube and integrated seat-tube clamp which contributes to a tiny seat-tube measurement like 47cm. Confusing, right?
The best rough guide for sizing is to completely ignore the specified sizing and instead use effective top-tube length—this is the distance between the centre of the seat-tube or seat-post and centre of the fork steerer or head-tube, level with the ground. The key complicating factor to bike measurement is the variety of top tube angles, and using the effective top-tube (ETT) length brings some degree of standardisation to the process.
The other rough guide you can use relates to the height of the front of the bike—the most commonly applied dimension here is the headtube length (HT). This is a slightly imprecise guide, as it doesn’t account for differences in headset style or fork length. An external headset, for instance, might add a couple of centimetres to the height of the front end compared to an integrated headset, so it’s far from exact, but if you’re not overly fussy about your bike fit, this may be a good start to getting comfortable.
For many riders, however, a higher degree of specificity is required than can be attained from top tube and head tube length. This could be because of niggling injuries, or high mileage, or a desire to exactly replicate a bike fit from one bike to the next. In this scenario, the most effective tool at your disposal is understanding two dimensions: stack and reach. This dimension uses the bottom bracket as a fixed point in an X–Y coordinate system. Put another way:
- Stack: The vertical distance between the centre of the bottom bracket and the centre of the top of the headtube.
- Reach: The horizontal distance between the centre of the bottom bracket and the centre of the top of the headtube.
These measurements give you a bike’s frame stack and reach—the most common measurement used when we talk about stack and reach. You can use the same principles but measure to the centre of the top of the handlebar, to incorporate stem length and stem angle, as well as any external headset cups, cone spacers and steerer spacers.
The value in using these dimensions is that they account for the complex interaction that headtube and seattube angles may have on the sizing of a bike, and variations in fork length and rake.
The reason reach and stack dimensions can be so important is demonstrated with the following real-life example from an OEM frame manufacturer:
| SIZE | Seat-tube | Top-tube | Head-tube | Stack | Reach |
| XS | 480 | 525 | 105 | 510 | 383.4 |
| S | 510 | 540 | 120 | 522 | 385.2 |
| M | 540 | 550 | 155 | 557 | 384.8 |
| L | 570 | 565 | 190 | 588 | 385.1 |
| XL | 600 | 580 | 215 | 612 | 392.5 |
From the top-tube or head-tube dimensions, you would expect a nicely linear progression through the sizes; the jumps don’t appear to be anything too dramatic and there appears to be a frame option to suit riders of a wide range of heights. It’s only when looking at the ‘reach’ figure that this illusion is dispelled—a rider on a small frame is actually having to reach further than a rider on a large, and there’s less than 10mm difference in reach between the smallest and the largest sizes; in order to compensate, wildly short and long stems will be required, with adverse effects on the bike’s handling.
Furthermore, not only does this mean that the sizing is confusing and likely to result in a bad fit, but it also means that there’s likely to be little to no consistency in how the bike will ride from one size to the next.
A more balanced sizing chart (this one from Specialized’s Roubaix model) looks something like this:
| SIZE | Seat-tube | Top-tube | Head-tube | Stack | Reach |
| 49 | 445 | 514 | 125 | 528 | 378 |
| 52 | 475 | 536 | 145 | 547 | 379 |
| 54 | 495 | 547 | 165 | 564 | 380 |
| 56 | 515 | 565 | 190 | 590 | 387 |
| 58 | 540 | 582 | 225 | 622 | 392 |
| 61 | 565 | 601 | 245 | 643 | 398 |
| 64 | 600 | 616 | 260 | 657 | 409 |
Note the logical increases in stack and reach, and lack of funny discrepancies like those in the previous example.
Whilst stack and reach is a valuable tool in working out the correct size for a bike, it’s arguably even more useful in replicating a bike fit from one bike to the next. You can use online calculators such as bikegeo.net to input measurements—useful if you’re shopping for a new bike, say, and only have a geometry chart to go off, rather than a physical bike to measure against. If you have two bikes though, it’s time to bust out the tape measure. Say you’ve got a road bike, a cyclocross bike and a niggling back. Your bikes are probably of pretty much the same labelled size, but whilst you might feel comfortable on the road bike, something feels off on the cross bike. The following steps will allow you to calculate and compare stack and reach of your bikes, and quickly identify what changes are needed to standardise their fit.
Measuring stack and reach
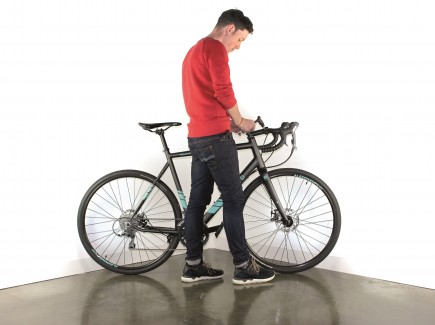
- Place bike 1 diagonally across the corner of a room (rear tyre touching one wall, handlebar touching the other).
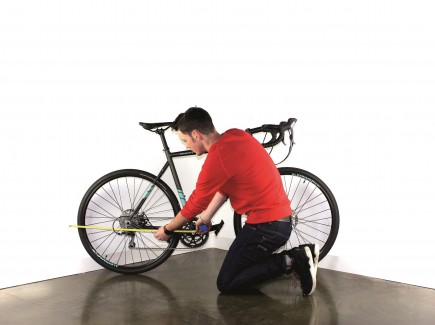
- Measure horizontally from the back wall to the centre of the bottom bracket. Record.
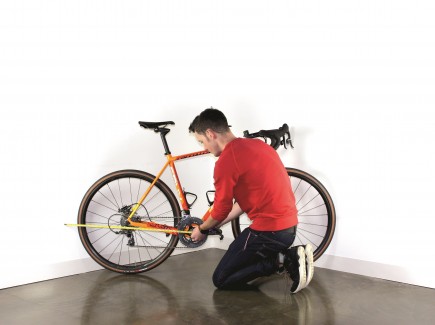
- Measure vertically from the floor to the centre of the bottom bracket. Record.
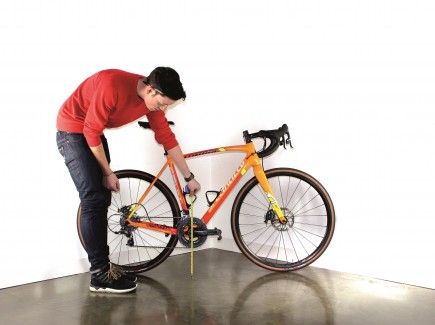
- Measure horizontally from the back wall to the centre of the handlebar. Subtract the figure from #2 from this measurement. This is your handlebar reach.
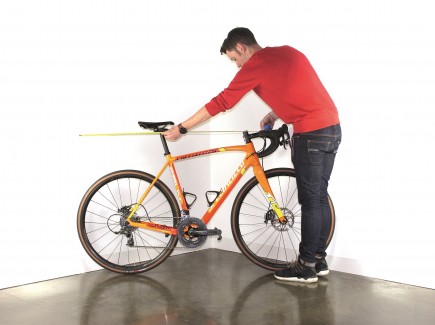
- Measure vertically from the floor to the centre of the handlebar. Subtract the figure from #3 from this measurement. This is your handlebar stack.
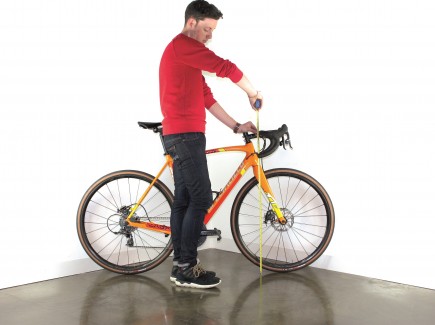
- Run through the same five steps for bike 2, and contrast the measurements. In our examples, bike 2 has a reach 2cm longer than bike 1, and 3cm taller stack.
- Using the same principles, you can measure to the nose of the bike seat and seat height and setback.
- You will now be able to see what changes need to be made to reconcile the differences—perhaps a change in stem length or angle, or a move up or down the fork steerer is all that is necessary. You can also measure from the centre of the handlebar as a guide for position of the levers. In the case of our demonstration bikes, to get bike 2 to fit the same as bike 1 required a drop of stem position and some adjustment to seat setback.
And there you go! You’ve now worked out how to identify and rectify sizing discrepancies between bikes, and are ready to ride off into a more comfortable future.
Ride On is the member magazine of Bicycle Network. Not a member? Join today and enjoy all the BN benefits including comprehensive rider insurance – Details Here


I am glad you used the Specialized Roubaix as your good example.
I am 6’4″ and currently ride a 61cm Roubaix. It feels a “snug comfortable”. Yet I have wondered about a 64cm Roubaix. Ofcourse, being on the island of Hawaii, I can’t be fitted on a 64 as none are available per my knowledge. My current 61cm Roubaix is a 2010. Will your example measurements be true for years 2010 to 2014?
Also, I know what you mean on a different bike and the feel. I also ride a 2008 Trek Madone 62cm and it makes me feel a little stretched in the reach. Yet, in measure it is only one cm difference yet feels much longer in the reach.
Any feedback will be appreciated.
Hi Dano,
Apologies for the slow response. There were some changes in geometry between 2010 and 2014 – as they get newer they’ve gotten a bit longer, with a slacker front end – and there are bigger changes still for the current iteration. The geometry measurements in the table are from the 2015-2016 model (aka Roubaix SL4).
Re: the Madone – part of what makes bike geometry such a complicated puzzle is that the frame is just one part of the equation! There’s also handlebar reach, stem length, and seatpost setback to factor in, which can quickly add up to a few centimetres difference on a bike that may otherwise be pretty close in frame dimensions. I’d be taking a look at the cockpit dimensions to see whether there’s anything there that is throwing things out.
Hope this helps!
These measurements produce 4 figures
Handlebars stack and reach.
Frame stack and reach.
How do you compare them to an OEM who only supplies 2 figures?
When you want to buy a new frame and a stack and reach figure isn’t listed for you current frame?
Thanks, Iain.
I am actually a ride on member.
Hi Cam,
Thanks for the comment. Bike manufacturers usually provide the frame stack and reach, usually measured to the top of the headtube. However, if the frame features an external headset (less common these days) you need to factor that dimension in as well. You can then use the comparison of frame stack and reach to work out what stem length is needed, how many spacers, etc to replicate your fit from one bike to the next (which will hopefully achieve a similar handlebar stack and reach).
If your frame stack and reach is not known on your current bike, you can roughly calculate it using the known figures on the geometry chart with a tool like http://www.bikegeo.net.
Hopefully this helps!
Iain