

Retro-Direct Bike Gearing – Pedalling Backwards & Forwards

Retro-direct gearing provides two forward gears by pedalling either forward or backward. It was invented in the 19th century and developed by various people before being patented in a single-chain version by Hirondelle in 1903.
Once derailleurs and internal hub gears became established, however, the retro-direct system fell out of use. But Scott Mayson has revived this ingenious, long-lost gearing system … with the aid of a 3D printer.
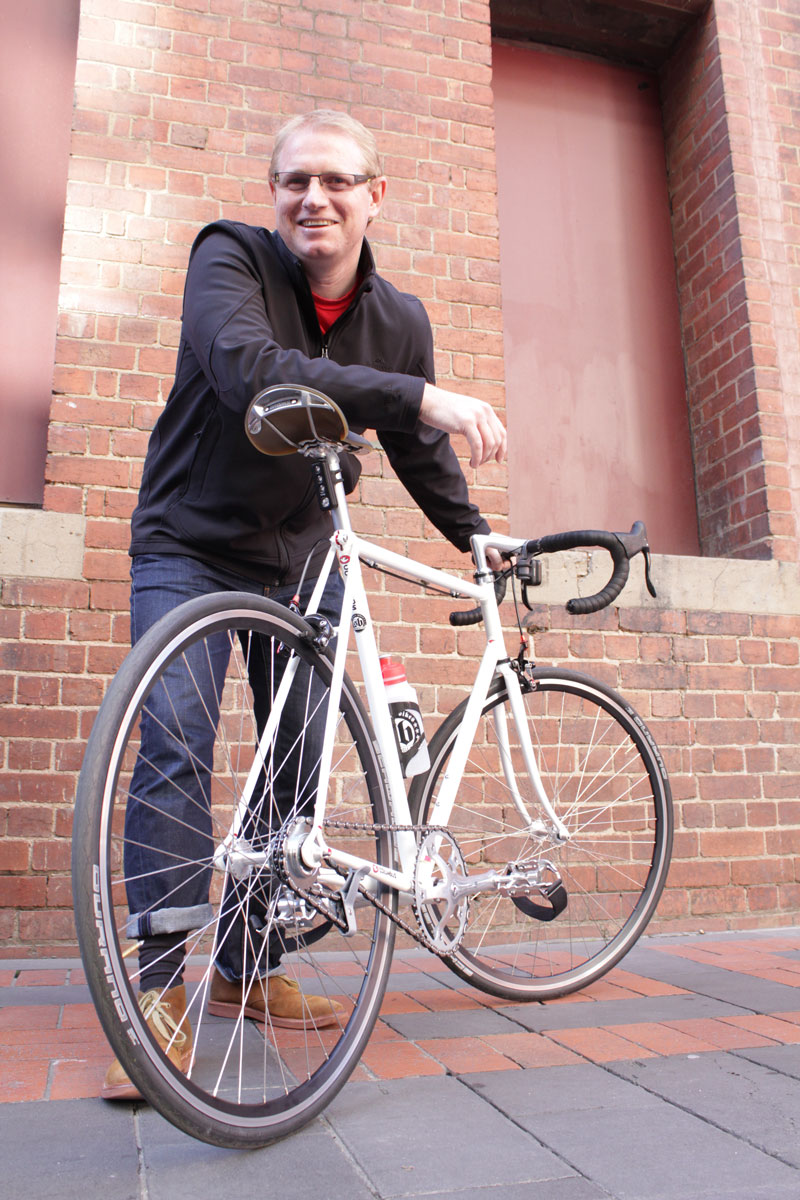
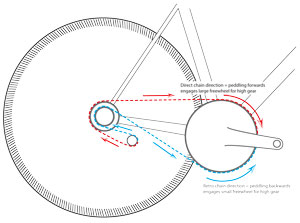
With two freewheels on the rear hub, a tensioning jockey wheel below the chainstay and a single loop of chain, the rider pedals forward to engage one gear and backwards to engage the other.
The gears are set with different sized freewheels, with some riders preferring to pedal forward for the higher, cruising gear and some preferring—as it is in Scott’s set-up—to pedal forward for the lower gear for starting off and for climbing.
How did you come up with this project?
I was searching the net for interesting fixed gear bikes for this build and I found a blog account of creating a retro-direct bike. I had to work out how the mechanism worked. Then I had to find out what modern components were required and what I had to fabricate myself. My bike shop gave me an old freewheel hub and a few bits to try it out.
How did you make it?
I had received an 80s Daccordi frame with an interesting history from a colleague at RMIT that sat in my shed until I took long-service leave. I set about removing all of the unnecessary hardware until I had a clean frame, that I then painted.
From there, I worked out the chain line for an 1/8th chain (all retro-directs on the internet have 3/32 chains, which are easier to build). I also had to grapple with hub spacing for two freewheels of 17 and 22 teeth, respectively, and the location for a jockey wheel mount that I would have to 3D-print myself. Plus, I had the wheels hand-built.
How did you fabricate the special parts?

The tensioning jockey wheel mount is the essential custom part in the setup. I have an Ultimaker 3D printer to make plastic prototypes. This was the hardest part to design as the 1/8th chain does not have too much flex. I made 10 prototypes that overcame various problems that appeared. With the successful design, I ordered the part to be made in polished stainless steel by a commercial 3D-printing fabricator (Additive Manufacturing).
To position the jockey wheel, I had to customise a drill guide on the 3D printer to place a hole in the frame for an M5 steel nut insert. This was epoxied and riveted into the frame perpendicular to the hub axle to locate the jockey wheel mount.
I also didn’t like the brake cable guides along the top of the top tube, so I removed them and 3D-printed guides to run the cable on the underside of the top tube.
What’s it like to ride?
The bike is absolutely amazing to ride. Pedalling backwards is not arduous at all—it’s pretty intuitive to ride actually. You pedal forwards for low gear and for climbing, and backwards for high gear for the flat and downhill.
What sort of comments do you get from other riders?
Commuters don’t seem to notice; they’re too busy speeding into the city. Some look back but that’s it. Roadies, however, have a roving eye for bikes and I have had many roadies follow me for a kilometre or two and then ask, “How are you doing that?” Then we have a conversation about retro-direct bikes for the next five kilometres.
Are you pleased with the result?
Yes, I have not ridden my full-carbon Bianchi since I got this running. It’s just so smooth to ride. I rode more than 150km on the plastic 3D-printed part while waiting for the delivery of steel part. Peddling backwards has improved muscles that I did not know I had and improved my square peddling technique.
A major advantage with this system is that the whole set-up is really light. It weighs in at 430 grams including the hub. In comparison, the Sturmey Archer S2 Duomatic 2-speed hub gear is 930 grams.
What are the quirks?
To remove the rear wheel, to repair a puncture for instance, it’s best to take the pin out of the jockey wheel and get the chain out of the way. With my set-up, I also have to deflate the tyre and angle the wheel while exiting the dropouts in order to get the freewheel clear of the frame.
A particularity of retro-direct is also that the bike can freewheel forward but cannot roll backwards. That is handy sometimes for parking the bike but it takes a little getting used to.
Should people try this at home?
Of course they should. All they need is intermediate mechanical knowledge of how to assemble components. I have parts online and could make customised parts that people could order from a professional 3D-printing fabricator. I’m doing this for someone now.
Ride On content is editorially independent and supported financially by members of Bicycle Network. If you enjoy our articles and want to support the future publication of high-quality content, please consider helping out by becoming a member.


Hey Scott, I applaud you for this initiative!! Would love to see the bike one day, hopefully we will cross paths rolling. 3D printing is certainly empowering! I am actually in the process of building my own 3D printer. Are you able to let me know what chain you have used here. I assume it’s 1/
Cheers,
Sammy
Hi Sammy,
All of the details of the build and components are on the website. The chain is Shimano NX01.
Best
Scott