

Brake adjustment: the basics explained
Iain Treloar demonstrates some quick, easy brake adjustments.

Brake adjustment can be a daunting prospect for the novice mechanic, but fear not—it’s significantly more straightforward than it may at first appear. The following tips for the three most common braking systems in Australia don’t require fancy tools—if you’ve got a set of Allen keys, two hands and ten minutes, you’ll be able to improve your braking performance.
The golden rule of brake adjustment, regardless of what braking system you have, is to check that the wheels are sitting correctly in the dropouts. Loosen the quick release on your wheels and wiggle the wheel from side to side until you’re confident that the wheel is sitting straight. Then, firmly retighten the quick release.
Identify which braking system you have. There might be some differences in appearance between models and brands, but the fundamentals will remain the same.
Caliper brakes
1. Firstly, it’s important to centre your brakes. Are the brake pads sitting an equal distance from the rim? If you can’t see this by eye, squeeze the brake and watch to see if the brake pads contact at the same time, or whether one pad pushes the rim across onto the other pad. To straighten the brake, loosen the bolt at the back, realign the brake and firmly retighten.
2. The next step is to check the distance of the pads from the rim. There’s no set rule on what this distance should be; some people prefer the brakes quite firm, others prefer a little more travel at the lever. Holding the brake caliper in one hand, loosen the bolt holding the cable and squeeze (or release) the brake calipers a little. Retighten this bolt and secure the cable, and then test how the brakes feel at the lever. Continue until the brake lever feels as you want it to.
3. The lever demonstrated in this position is not there to adjust brake feel, but to give space for tyre clearance when removing the wheel from the bike. When riding—and adjusting your brakes—make sure the point of this lever is facing downwards rather than out.
4. Now that you’ve adjusted for brake caliper position and cable tension, align the brake pads. These should be positioned so that they are centered on the braking surface. They should never make contact with the sidewall of the tyre, and should never be lower than the braking surface. Spin the wheel and check that the brake pads are aligned with the braking track all the way around.
5. Once cable tension and pad position has been set up, it’s easy to fine tune down the track with the barrel adjuster, as in the large image above. Turn this barrel clockwise to move the pads out from the rim, and counter-clockwise to move them closer. This is also the best way to adjust for cable stretch over time, without having to reset cable tension altogether, and allows micro-adjustment from in the saddle.
 |
 |
 |
| Step 1 | Step 2 | Step 3 |
 |
 |
|
| Step 4 | Step 5 |
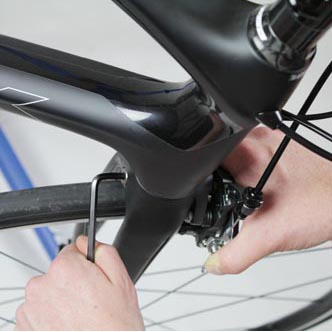
Disc brakes
Disc brakes are more complex to adjust than cable or V-brakes, and we will be taking a closer look at them in a future issue. The following is just one very simple, home-mechanic friendly way to fix a common issue. If your disc brake is rubbing, it is most often caused by an incorrectly aligned brake caliper, or the wheel having been incorrectly repositioned after removal. Before adjusting the brake itself, undo the quick-release skewer, check the wheel is sitting straight in the drop outs, and then firmly retighten the quick release. If the brake is still rubbing, the disc brake itself is the likely culprit. Disc brake calipers are attached either directly to a fork or frame (post-mount) or, more commonly, mounted onto a disc brake adaptor. Make sure that you’re adjusting the right bolts, as demonstrated in Figure 1.
1. Loosen both bolts on the brake caliper. They don’t need to be undone completely—just enough for the caliper to move side to side if you jiggle the caliper with your hand.
2. While squeezing the corresponding brake lever firmly, retighten these bolts. The wheel should now spin freely. If the pads are still audibly rubbing on the brake rotor all the way around, try this process again; sometimes it takes a couple of attempts before the caliper settles in its correct position.
3. If step two is still unsuccessful, you can also try to adjust the caliper by eye. In this figure you can see that there is a gap either side of the rotor. With loosened bolts, realign the caliper by hand, and then whilst holding it firmly in position, tighten the bolts with your other hand.
 |
 |
 |
| Step 1 | Step 2 | Step 3 |
V-brakes
1. After checking that the wheel is centered and spinning true, it’s time to adjust cable tension. While holding both arms of the brake with one hand, release the brake cable.
2. Gently release your hand’s pressure on the brake arms until the brake pads are roughly the distance from the rim for optimum braking. You may need to help guide the cable through its clamping point with your free hand.
3. Reattach the brake cable and tighten the bolt. Confirm by squeezing the lever whether the brake lever travel is to your preference.
4. Now that cable tension has been set, adjust the placement of the pads. To assist with positioning on the rim, either squeeze the V-brake arms hard into the rim with one hand to simulate braking (as demonstrated in the image), or squeeze the brake lever. Whilst the brake pad is loose, you can use your free hand to align the pad so it is contacting the rim in centre of the braking track. Once you’re satisfied that the pad isn’t set too low or rubbing on the tyre, retighten the bolt. Repeat on the other side.
5. Clear on one side but rubbing on the other? This is where the little screws on each side of the brake come into play. Running up the back of each brake arm is a metal spring, the tension of which is controlled by this screw. If the right brake pad is rubbing, increase tension on the right spring by winding this screw in, which will force the brake arm out. Continue adjusting in this fashion until the pads are not rubbing on the rim, and contacting evenly. Once you’re happy with the position of the pads, check how the brake feels when you squeeze it, and repeat steps 1-3 to fine tune the feel of the brakes.
 |
 |
 |
| Step 1 | Step 2 | Step 3 |
 |
 |
|
| Step 4 | Step 5 |
Ride On content is editorially independent, but is supported financially by members of Bicycle Network. If you enjoy our articles and want to support the future publication of high-quality content, please consider helping out by becoming a member.


Reblogged this on BikeNCA and commented:
With this wet weather…get your brakes ready to stop!
Shimano caliper brakes have a centre adjusting screw, this is used to specifically centre the brakes rather than loosening the bolt at the rear. It is used for fine tuning and much easier than loosening the main bolt as suggested plus a more accurate result is achieved. I say this as it is a shimano caliper brake used in the photos