

Don’t be left feeling flat
They can be very irritating, but punctures, properly handled, won’t ruin your ride, writes Rowan Lamont.

One of life’s deflating moments is a sudden realisation that a wheel rim is grinding on the road – your once-proud tyre reduced to little more than a feeble strip of flaccid rubber. Invariably it’s at an inconvenient time, in an inconvenient place, and it always seems to be the back wheel, which is more complicated, and dirty, to remove.
Steely resolve is called for. You must immediately abandon bike rider mode, ignore the temptation to blame everyone and everything, and unhesitatingly transform into ‘practical, no-nonsense, get a job done as quickly and efficiently as possible’ mode.
And in the back of your mind you must carry this thought; I will do what needs to be done to get me going again with the minimum of fuss, but I must not be so over-eager that I botch the job and get another flat a minute up the road. If you think getting one flat is a test of temperament, imagine getting two or three in quick succession – it isn’t uncommon!
Get to work
First, some great advice: always carry a spare tube, and use it to replace your punctured one, then do your patching work at home. It can save a lot of time and heartache.
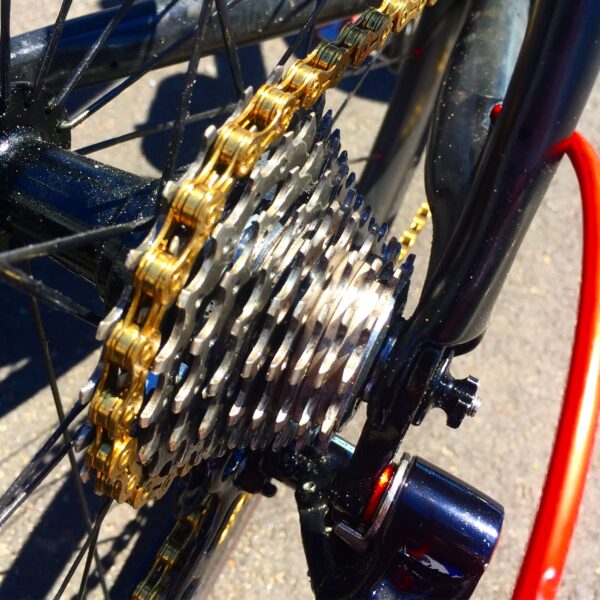
If your back tyre punctures, make it easier to remove the wheel by putting your chain onto the smallest cog. Getting your wheel on and off is something you should practise at home, and be aware that you will have to release your brakes first to get it off, and/or to get it on again.
If you can, carry and use at least two made-for tyre levers to get a start on removing the tyre from the rim.
When you take the tyre and tube off the rim, make a note of where the valve aligns with the tyre. If you remember this, when you find the hole in the tube you will know where to look in the tyre to find what caused the puncture. Without identifying the cause you risk a repeat flat.
Once removed, pump the punctured tube up and listen for escaping air or run it lightly over your cheek or lips to feel the air being expelled. When you find the hole, identify what part of the tyre/rim it originated from. Check the inside and outside of that part of the tyre and remove any sharp, embedded objects.
Also look for tears in the tyre itself. If the tyre has a severe open slit (more common on the sidewall), when you inflate the new tube it will bubble out and quickly puncture. Before inflating, use a piece of business card, five-dollar note, food wrapper or other available slim material inside the tyre, between the slit and the tube, to prevent the tube poking through; this technique (called using a ‘boot’) has gotten many riders safely home.
If you find a hole or slit on the tube’s underside, where it meets the rim, the culprit is likely to be a mostly unnoticed piece of bike anatomy: rim tape. It nestles around the inside of the rim, protecting the inner tube from the spoke heads. Rim tape can vary considerably in quality, and cheap tape will perish and allow a spoke head to penetrate.
You must take immediate action or face a similar puncture very quickly. For on-the-road repair, use some thin bit of material to temporarily cover the rim over the nearby spoke heads. At the first opportunity, buy some high-quality cloth rim tape; it is cheap, and will do the job properly for many years.
If the puncture is on the rim side and has two holes that look like a snake-bite, suspect a pinch puncture (see Take charge, below).
Now you’re ready to get your new tube in and inflated. Tuck it safely up into the tyre and, after bedding the tyre back on the wheel, pump the tube up a little. Take time to peek inside both sides of the rim, right around the wheel, to make sure you haven’t pinched a bit of tube. If you have, start again, or risk getting another puncture almost immediately.
Once fully inflated, check again to make sure the tyre has bedded snugly into the rim. These little checks don’t take that long, and if you skip them, you’ll inevitably regret it.

Avoid, avoid
After you’ve suffered a few punctures it’s time to investigate eliminating this inconvenience. And there is help at hand.
 There are many excellent puncture-resistant tyres with a tough protective lining, such as Kevlar, built into the casing to prevent sharp items pushing through. Although more expensive, and a bit heavier than regular tyres, you are unlikely to notice a riding difference unless competing, and you can genuinely expect years of puncture-free riding from them.
Slime is another reputable solution. It is a latex-based, luminescent green goop that you squirt into your inner tubes via the valve. It constantly rolls around inside the tube, but you are unlikely to notice it at work. When you get a puncture, the air rushing out also brings Slime to the hole, and it will plug the opening from the inside before too much air pressure is lost.
Take charge
There are also things you can do to reduce the threat of punctures without forking out for new products.
Riding with the correct air pressure in your tyres will help to avoid pinch punctures. Also known as snake bite, a pinch puncture can happen when a small section of your inner tube is momentarily sandwiched between your wheel rim, tyre and hard-edged object. Running into a curb or pot-hole are common causes. It typically leaves two parallel holes in the tube, like a snake has bitten it!
There are tyres available with extra-tough side walls that help to prevent snake-bite punctures. Over time, tyre sidewalls will naturally perish and become frayed, and sharp objects that would normally bounce off can pierce through. Check your sidewalls regularly and replace worn tyres.
Also check that when your brakes are engaged they rub only on the wheel rim; it is common for them to be misaligned, so that they also partly rub on the tyre, which will inevitably lead to a split and a nasty puncture.
There is a good reason why the back wheel suffers more punctures – that’s where most of your weight sits. If you see you’re about to ride into an unavoidable mass of glass shards, get up from the saddle and put your weight on your pedals. It may get you through.
Inner tubes can become stuck to the inside of a tyre and cause problems. Tyres slip around the rim through hard braking and riding over bumpy surfaces, and the valve on a stuck inner tube will be pulled against the sharp edge of the valve hole. If the rim slices the valve it is very difficult to fix, meaning a new tube is required.
An easy solution is to sprinkle talc over the tube, which prevents it sticking. A bonus is that it will also make the tyre feel smoother to ride on. While you are at it, check to see if the size of the valve hole suits the valve. If you are running Presta valves (the skinny type) in larger holes meant for Schrader (car type) use a little sleeve available from bike shops which will keep it perpendicular. If the valve came with a nut, use this too.
Have you ever noticed that punctures and wet weather go together? There is a theory that water dislodges debris that sits in the pitted road surface and then helps it stick to your tyre. Tiny shards often get picked up on the tyre, and may be not large enough to puncture through the rubber, but over time they lurk and wriggle inwards, only to do dastardly things to your inner tube weeks after being collected. By running your tyres at the recommended pressure the little shards have difficulty sticking into the rubber, so a quick top-up from a pump once a week can also work wonders.
Find a sharp tool and regularly have a close look at the surface of your tyre, picking any little shards out. Wearing protective glasses while doing this is a good idea because the blighters have a habit of flicking into your eye! Even better, use those cheap magnifying reading glasses you can by for just a few dollars; you’ll get a much better close-up view.
Patch it up
 Traditional puncture repair kits can contain some unusual looking objects. The goodies you may find include patches with silver foil on one side, clear plastic on the other; tube of vulcanising glue; sandpaper; crayon; French chalk; metal grater; and some thin, transparent tubes.
Traditional patching is done as follows:
- Slightly inflate the tube and locate the hole. Listen for escaping air, or feel it escaping on your cheek/lips, but if that doesn’t work, submerge the tube in water and look for a telltale bubble trail.
- Mark the location of the hole with the crayon.
- Use the sandpaper to take the shine off the area where you will patch, and sandpaper down the raised tube moulding line. Do not use the grater for this job; it is too harsh.
- Apply a dab of glue and spread it out with your finger in a thin layer over the area to receive the patch. The glue must be dry before the patch can be attached. Blow on it to speed up the process.
- Take the silver backing off an appropriately sized patch and apply it to the glue. You can leave the thin plastic or paper top layer on. Step on the patch and count to 100.
- Use the metal grater to grate some French chalk into a powder. Rub the powder over the patch area to soak up any extra glue. This prevents the patched area becoming stuck to the tyre.
And what is the tiny transparent tube for? Woods valves (no longer seen in Australia) had a small rubber tube inside that would perish over time and cause a flat. These were replacements for that tube. Happily, you won’t need them!
Stick-on patches are great for getting you out of trouble in a hurry and save you a bit of hassle, but won’t be a long-lasting fix as the glue acts as an adhesive. The glue that comes in a puncture repair kit works by slightly dissolving the surfaces of the tube and patch. It encourages cross links between the two pieces of rubber, making for a strong and flexible bond.
Ride On content is editorially independent, but is supported financially by members of Bicycle Network. If you enjoy our articles and want to support the future publication of high-quality content, please consider helping out by becoming a member.


After fixing a puncture you can clean your oily hands using Sunscree, then wipe off on a rag (or like me get into strife with you partner by using your hankie)
Another puncture reduction item is a taught wire across the forks as close to the tire as possible. This dislodges the glass, clatrop on the first time round and thus it is not pushed into the tire by successive rotations of the wheel. It work wonders on my bikes when living as a kid on an orchard full of caltrop (double gees).
I read somewhere, years ago (I am 71 yo), that the “front tyre flicks up” and the “back tyre picks up”. If you remove the sharp object before it does one rotation on the rear tyre you can reduce punctures. Refer Kelvin Davis comment November 8, 2013.
At the time I fabricated from a spoke, a small fork like tool which, when bolted into the front and rear bike fork bridge, just cleared the tyre(s). I have not had a puncture since 1984.
Worn a few tyres out, but never had a puncture.
I once allowed my youngest son to ride his older brother’s road bike. We lowered the seat and handlebars to minimum height and he was just tall enough. We were having a great time until we left a park and hit the concrete edge where the cyclepath started. I edged up slowly but he hit the edge at full speed. Within a kilometre he had dead flat tyres front and rear. Turned out both tubes had two holes – a double snake bite! Fortunately we were fairly close to home but it was a long walk as we only had one spare tube.
He has however learned a valuable lesson that he will never forget.
Does anyone actually repair tubes? I worry too much that my handiwork will just lead to another flat in the wild, but I loathe throwing them out. I’ve seen some bikeshops in the USA give you discounts on repaired tubes for trade-ins.
I always repair my tubes. They are covered in patches! I do not usually have any problems, but have occasionally seen some of the adhesive patches leak some weeks later. I just re-patch them and then it’s no problem.
I have switched back to the old glue style and never had any trouble since.
I have never found a good re-use or recycling option for old tubes, but am working on it. For now I push them right to the end and I could get 12-24 months out of each one (and upwards of 10 patches in that time).
Reblogged this on BikeNCA.
If you ride every day I recomend checking tyre pressure 2nd to third daily. I also recommend puncture resistant tyres.
I put a pair of first aid / latex gloves in my kit. Quick to put on, and keeps the dirt and particularly grease off my hands