Teach someone to ride
Did your little one get their first bike for Christmas? Or maybe your partner never learned to ride? There is more to teaching someone to ride than training wheels and grazed knees, writes Nicola Dunnicliff-Wells.
")
Like many kids, I learned to ride with an adult running behind, holding the seat till I could balance on my own. This method is fine for an eight-year-old, but is rather undignified if you’re forty-eight. Forty-eight? A surprising number of adults cannot ride a bike. The older you are, the harder it is to learn and the thought of falling off and embarrassing yourself makes many afraid to try.
But there is an easier way – I call it the balance-bike method – which works equally well for adults and children. I have used it successfully to teach adults of varying age and sporting ability. The balance-bike method is quick, safe and non-intimidating. It concentrates on one skill at a time: balance first, and then pedalling. Once these are established, other skills, such as steering, are refined.
Whatever method you use, the outcome (and your relationship) is likely to be better with a patient and encouraging approach. Do not assume anything. Become aware of things you do subconsciously that can help the learner (like, for example, tilting your bike to get your leg over when you mount/dismount).
Finding balance
Balance is tricky because a bike is inherently unstable. It needs momentum to stay upright, but speed is scary for a beginner. Two factors make the balance-bike method effective:
- Removing pedals and lowering the seat so the learner can sit with both feet flat on the ground, creating a ‘balance bike’ (like those popular with preschool children). This feels more secure and gives the learner control.
- Practising on a gentle slope (ideally one that flattens out). Being on a slope gives the bike momentum enough to stay upright without pushing or pedalling. A mown grassy slope is great initially (if available) because it prevents the bike from going too fast, but very soon you will need a sealed surface.
The balance-bike method: step by step
The learner’s bike must fit adequately. Do not try with a bike that is too big. Along with fit, you should check the bike’s condition; ensure, too, that the helmet fits and is adjusted correctly.
Before starting, explain to the learner how to use handbrakes (and encourage their use, rather than feet). Later you may need to demonstrate that braking too much stops the bike’s momentum, which makes it harder to stay upright.
At the top of (or partway up) the slope, have the learner sit on the bike with both feet on the ground. Have them hold the handbrakes on to prevent the bike from moving. Then have them release the brakes and roll down the slope, lifting their feet off the ground if they can. Repeat as many times as is necessary, encouraging them to hold their feet up for longer.
When they can roll all the way a couple of times without their feet touching the ground, add one pedal. Have them roll down with one foot on the pedal and the other lifted off the ground. Repeat until the learner feels confident.
Often, the challenge is getting the learner to relax: to allow their body to find the balance. It’s hard to find balance when you’re rigid. Try gentle instructions such as: ‘Let your upper body relax’; ‘Trust your body – it will know what to do’; ‘Let your body go all floppy like a rag doll’; or ‘Try to hold the handlebars a bit more loosely’.
I find that learners are more successful if they focus and relax before starting off; rushing in can be counter-productive. Encourage them to use this procedure each time:
- Sit on the bike with both feet on the ground and hold the handbrakes on
- Look ahead to where you are going
- Put one foot on the pedal (without looking, if you can)
- Consciously relax your upper body
- When you are ready, release the brakes and away you go
- Keep looking ahead
Add the second pedal. Have them start rolling with one foot on the pedal, then lift the other foot onto the pedal while they roll (the knee will feel too high since the seat is so low), then continue to coast.
Some learners will get this fairly easily; others will need to do it over and over and may begin to get tired or discouraged. Reassure them that it’s normal – it just takes practice. Keep up encouraging feedback.
Take a break. Aim for a positive finish to each session before the learner gets too tired. Many adults can go from zero to pedalling within one two-hour session; others will take longer. Shorter sessions are obviously more suitable for children.
As the learner is able to coast comfortably with both feet on the pedals, encourage them to turn the pedals as the bike loses momentum at the bottom of the slope – they’re riding!

Now what?
It’s a thrill for learners to find themselves riding. Now they can learn to start off smoothly on the flat, and practise steering.
The key to starting off smoothly is to have the starting pedal in the 2 o’clock (or ‘power’) position so that the first pedal stroke provides momentum enough for the bike to go straight without wobbling. Follow a similar procedure to that described in step 3 (modified accordingly). Then gradually raise the seat, if they’re willing, and practise standing up to start off.
Beginners often worry about steering even before they’re pedalling. The answer is simple, but needs repeating often: look ahead to where you want to go. Along with ‘relax’ this is possibly the most important advice you can give.
Chalk long parallel lines about 40cm apart on the ground for the learner to practise riding between (straight and/or curvy). If that’s easy, scatter soft obstacles (e.g. margarine containers) within the lines for the learner to avoid. Then ride alongside the learner on a bike path.
Encourage the learner to keep riding regularly, ideally with you or another encouraging cyclist. A whole new world awaits…
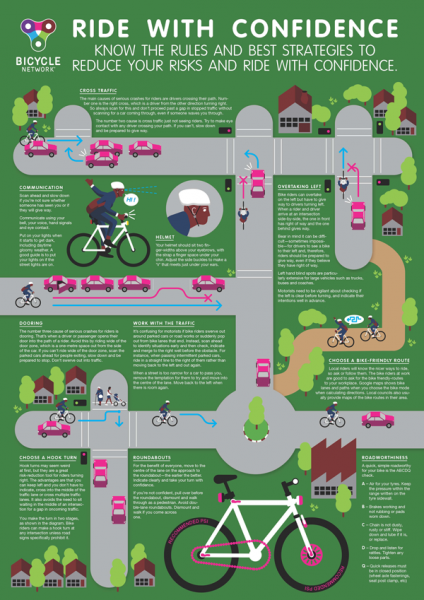
Tip – The front brake is your friend and other braking tips
You may fear it will send you flying over the handlebars but your front brake is your best helper when it comes time to stop. It is the strongest of the two and will stop you much faster than the rear brake. Squeeze gradually rather than grabbing it to avoid doing a superman. The best braking practice is to use both front and back at the same time with equal pressure.
If you have to brake hard, also known as emergency braking, lift up off the seat and push your bum (and your weight) back over the rear wheel. This puts more weight onto the rear wheel, giving it more traction and making it less likely for you to flip over the front wheel.
Use your brakes when approaching a corner rather than when you’re already turning, especially in wet conditions.
Ride On content is editorially independent, but is supported financially by members of Bicycle Network. If you enjoy our articles and want to support the future publication of high-quality content, please consider helping out by becoming a member.
Connect with Ride On on Facebook or Twitter.
Ride On content is editorially independent, but is supported financially by members of Bicycle Network. If you enjoy our articles and want to support the future publication of high-quality content, please consider helping out by becoming a member.