Get more intimate with your bike chain and you’ll find your riding easier, and a lot cleaner, finds Stephen Huntley.
Like many components on a bike, the chain is a relatively simple but beautifully effective piece of engineering that has hardly required any design improvement in over a hundred years.
Despite being exposed to the worst of the elements on every ride, even without any maintenance it will reliably transfer the energy from your legs to your back wheel for thousands of kilometres.
To prove the point, testing of bike chains in a controlled study found they have a remarkable energy efficiency score of up to 98.6%, meaning less than 2% of the power used to turn your front chainring gets lost on the journey back to the rear gears.
Before the bike chain became popular, people pedalled a giant front wheel to move about in a manageable gear – the penny farthing being a famous example. The first bikes with reasonable-sized wheels fitted with chains were called, understandably, safety bikes.
Inside knowledge

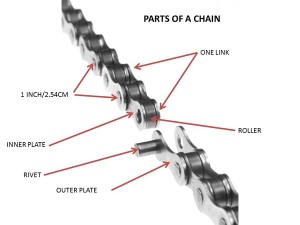
Look closely at the side of your chain and you’ll notice it has a series of outer and inner plates. From above you’ll see tubular rollers separating the two halves of the chain, between the inner plates. Hidden inside each roller is a pin (also called a rivet) that connects each side of the chain. You can see the end of the pins poking through each outer plate. The rollers and inner plates must rotate freely around the pins.
One chain link consists of a matching pair of outer and inner plates, two rollers and two pins. A standard derailleur chain will have approximately 57 links, made up of 114 outer plates, 114 inner plates, 114 rollers and 114 pins; a total of 456 parts.
On a bike fitted with derailleur gears, the effective length of the chain must constantly change; a chain fitted around the biggest gear at the front and back of your bike has to be much longer than a chain fitted around the smallest gears.
To manage the situation, the rear derailleur has a spring system that regulates chain length. It is stretched out towards the front to make a long chain when in big gear combinations, and springs back to take up the chain slack back when in smaller gears. Watch the angle of your derailleur in different gear combinations and you’ll see it in action.
In motion
With your bike in a big rear gear, lift the back wheel off the ground, slowly turn the pedals forward,

and follow the progress of one chain roller as it passes around the back of the gear. You’ll see it pushing against the rear of a gear tooth and driving it forward until it eventually rolls over the top of the tooth’s wave-like shape, disengaging on its way to the front gear.
As you can imagine, over time this constant motion of the chain’s rollers through the gears will grind down and alter the shape of the gear’s teeth. A brand new sprocket will have teeth with steep backs and almost flat, plateau-like sections on their peaks. As they wear, the teeth become rounded at the back and the peaks become sharp, pointing-forward crests; like real, breaking ocean waves.
The chain also becomes slightly elongated over time. Constant pressure on rollers and pins changes their shape and effectively lengthens the distance between each roller; known as chain ‘stretch’.
Both an elongated chain and worn gears will lead to slipping as you pedal, with rollers skipping over gears instead of snugly nestling between them. And a worn chain will wear out gear teeth much faster than a new chain.
How do you measure chain wear? BSC Bikes mechanic Ben Yates told Ride On: “I use a simple chain measuring gauge. You slot it in between rollers and it tells you at a glance if the chain is 75% worn, or 100% worn. You should replace the chain once it reaches 100% worn, but I change mine at 75%. It means I don’t have to replace my rear gears so often.
“Generally speaking, if you leave your chain on the bike until it measures 100% worn, not only will the chain need replacing, but the rear gears will also be worn, and will need replacing as well.”
You can buy a simple chain measuring gauge for about $40, and they’re a very handy and easy-to-use tool. Otherwise, you can get the ruler out. Each chain link on a new chain is one inch (2.5cm) apart. Twelve links (24 pins) should measure 12 inches (30.5cm) exactly. The chain needs replacing if it has ‘stretched’ an extra one eighth of an inch (3mm).
How long should a chain last? Many people will change their chain once a year during an annual service, but it varies enormously, depending on conditions, distance travelled, type of chain, and the type of riding you do.
“If you do a lot of hill riding you put your chain under a lot more strain,” explains Ben. “And if you also regularly push a very high gear you’re also straining the chain more. I notice a lot of commuters push very high gears. Depending on distance travelled, that could mean a new chain is needed every six months.”
Chains vary in price, with reasonable-quality ones starting at about $60.
Choices, choices
Chain widths vary depending on the gear system on the bike. Six, seven and eight-speed bikes normally use the same chain width, but nine, ten and eleven-speed bikes each have a unique-width chain, while singlespeed bike chains come in two widths.
And compatibility between makes of chains and derailleur systems is also an issue. “I would recommend Shimano chains for Shimano derailleur systems for optimum performance,” says Ben, “although some people do use SRAM chains on Shimano systems. And Campagnolo systems will normally only work well with Campy chains, although, once again, people do try alternatives.”
Stuck link
Sometimes you may notice that your chain is jumping every few pedal strokes. Usually the culprit is a stuck link, with the outer plates binding the inner plates and not allowing them to rotate on their pin. Fortunately it can easily be freed up. The first job is to find the problem link. Put your bike into small gears front and back, which creates maximum slack in the chain. Get down low near the rear derailleur and very slowly move the pedal backwards. Keep a close eye on the derailleur. “The derailleur will jump as the stuck link goes through,” says Ben. “It will be pretty obvious which link is causing the problem.”
Lubricate the offending link, then get your thumbs together over the pin of the problem area. Press the chain forward and back into ‘U’ shapes, with your thumbs the base of the ‘U’. That should do the trick, but try ‘Z’ shapes if that doesn’t work.
Keep it moving
Inner links and rollers must be able to rotate around their pins, and so each pin should have an

adequate coating of lubrication. The trouble is, pins are mostly hidden inside rollers, and so are not easy to get at.
A poor solution is to drench their chain in lubrication; this can be more harmful than not lubricating at all. Road grit and grime will quickly get stuck to the lube, creating a dark gritty paste that wears the chain and gears out quickly.
You should also ideally only lube a chain that is clean; adding oil to a dirty chain will, once again, create a destructive, gritty paste.
The simplest way to keep a chain clean is to regularly lean your bike against a wall and hold a clean rag around the bottom stretch of chain. Slowly pedal backward for half a minute, pulling the chain through the cloth. If you do this often enough you will never have to give your chain a deep clean (the very organised will do this after every ride).
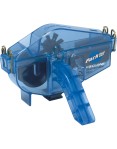
If, despite your best efforts, the chain has become mucky, the simplest way to clean it is by using a chain scrubber. Costing from about $50, they are a small plastic tank that clips around the bottom stretch of chain, enclosing it. You add solvent, back pedal, and little brushes gives the chain a good scrub, with the dirty stuff left in the tank, rather than spraying all over the bike, which is what happens if you use tooth or dish brushes.
You’ll then need to wash the chain in detergent and water, rinse and dry it.
Once cleaned with solvent, the chain will now need to be lubricated, and there are a lot of choices. What to use? Ben suggests a dry oil, rather than a wet oil, which can attract grit and dirt. He is also of the opinion that less is more.
“I tend to put one drop of oil on every roller by holding the tip of the oil dispenser between the pulley wheels of the rear derailleur and slowly turning the pedals backwards,” he says.
It is a good idea to then run the chain round for half a minute, wait for a few minutes for the oil to penetrate, then get a clean rag and try and wipe off all the excess oil. You should be able to touch the chain without getting a greasy hand.
“Many people leave too much oil on the chain, which just attracts grit,” Ben adds.
Chain breaker

Some people like to break their chain, take if off the bike, bathe it in solvent for a very deep clean, lube it and reattach it to the bike. A chain-breaker tool (simple models start at about $40) is handy for this, but much simpler and easier is to fit a ‘masterlink’. This is a special chain link that can be quickly and easily released to free the chain, then locked in again to reattach it to the bike. You can buy masterlinks for between $15 and $30 that can be fitted on to most models of chains.

Singlespeed
After removing a tyre on a singlespeed to repair a puncture it is important to bolt the wheel back in a position that provides adequate, but not too much, tension on the chain. For best tension, move the wheel along its horizontal dropout so that when it is bolted in place you can lift the bottom mid-section of chain upwards by about 10mm. You’ll also find that most singlespeed chains come fitted with a masterlink for easy chain breaking.
Hooking on

Sometimes your chain will come off while riding; typically when it is in a low gear at the back, as this
creates slack in the chain. Going over a bump the derailleur can be jolted forward, creating even more slack, and the chain disengages from the front gear.
If your chain comes off the front chainring, quickly change to the smallest gear at the front. Get off the bike, push the lower jockey wheel on the rear derailleur towards the front of the bike, get a grip on a lower section of chain and pull it forward, hooking a few links onto the small chainring at about the 5 o’clock section. Let go of the derailleur slowly as you rotate the pedals backwards and the chain should slip easily back on.
Another technique that works for some is to continue pedalling very slowly after the chain dislodges, while moving the front derailleur in the opposite direction to the side the chain came off on. The front derailleur will often hook the chain back onto the gears itself without you having to get off the bike. A very clean manoeuvre that is worth mastering!
Ride On content is editorially independent, but is supported financially by members of Bicycle Network. If you enjoy our articles and want to support the future publication of high-quality content, please consider helping out by becoming a member.


With respect to measuring the chain wear, I suggest a read of this posting, “Chain Wear Indicators.” I have now moved over to using a Shimano TL-CN40 and find I am getting much better life out of my chains as I am not replacing them prematurely. Cluster wear is not being reduced either reinforcing that I was replacing chains to early previously.