Skilled to build

For the home mechanic, building a bike up is a rewarding labour of love. Iain Treloar runs you through the process.
There’s something uniquely satisfying about working on your own bike, happily whiling away the hours tinkering and tweaking, learning new skills and developing mechanical autonomy. Perhaps the purest expression of this for a bike rider—short of building a frame—is building up a bike, from its component parts, from scratch, oneself.
It’s this process where you get to put into practice a whole raft of different processes. There’s the fine tuning of derailleur adjustment, the tender wrapping of bar tape, the application of grease and carbon paste, the turn of hex keys and torque wrenches—and then, at the end of it all, you have an intimate knowledge of the particular quirks and idiosyncracies of your bike, and a deeper love for it as a result.
There are so many particularities from bike to bike, and so much troubleshooting, that we could easily exhaust an entire issue of the magazine running you through all the steps in the fullest detail; this is far from a comprehensive guide. But if you’re building a bike from scratch, these are some general step-by-step tips along the way that can be broadly applicable.
Let’s assume that you’re starting with a new frameset and going from there. You will usually have the frame, the seatpost clamp (but probably not the seatpost) and the fork. For simplicity’s sake, given the very particular and often complicated presses and processes involved, let’s also assume that you’ve already got a bottom bracket and headset installed.
For this demonstration, we’ve used a stainless steel road frame from Rikulau, the new Tiagra groupset from Shimano, Soul’s S2.0 wheelset, Profile Design finishing kit and assorted other nick-nacks we’ve accumulated along the way.
A bike is a pure, relatively simple piece of machinery, but you’d be forgiven for looking at all the bits above and wondering how you’re ever going to get all of that together into something remotely rideable. Break it down into little steps, and it all becomes a bit more manageable.
Do your homework
Start from the frameset, and build an understanding of what its dimensions and allowances are. You’re looking for things like:
Seat post diameter (most commonly 27.2, 30.9 or 31.6mm, but there are plenty of exceptions)
Front derailleur clamp (usually 28.6, 31.8 or 34.9mm)
Fork steerer diameter (usually 1 1/8”, but not always—this will affect the dimensions of the stem you’ll need to get)
Fork steerer length
Tyre clearance
Bottom bracket type, and any adaptors used (this will affect what crankset you will need)
Once you’ve worked these out, you’re able to accumulate the correct parts to complete the build. Once you’ve got the lot, lay them out neatly (a tidy workshop is an efficient workshop) and begin putting the bike together. You can do this in a few different orders, but for me, the most logical sequence is as follows:
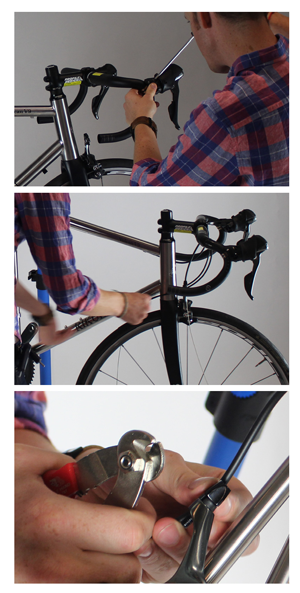
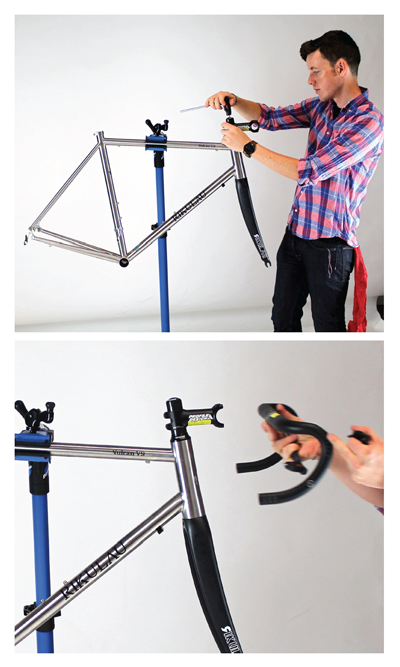 Stem installation
The vast majority of bikes these days use threadless headsets and stems (as opposed to the quill styles of days past). This makes for easy customisation of stem length and angle, and easy fitting.
The security of the stem is determined by the stem bolts, not the tension of the stem cap—this component is what loads the headset bearings. To fit the stem, you need to undo the stem cap, slide the stem on, and tighten the stem cap down again. This should be snug enough to remove play from the spacers below the stem (they should not be able to spin by hand) but you don’t need to wrench down any harder than that as it will interfere with the bearings.
Then, align the stem and tighten the stem bolts with a torque wrench.
Handlebars
Undo the stem’s faceplate and fit the handlebars. Take care when retightening the faceplate that the bolts are tightened equally and evenly, and to the correct torque. The gap should be the same at the top of the plate as below, unless expressly specified otherwise by the manufacturer. You may need to finetune the bar angle when you’ve got the bike out of the stand and are doing the final checks for setup, but get it as close as possible.
Seatpost
Before installing the seatpost, take a second to double check the materials of the post and frame. If it’s an alloy or steel post into an alloy or steel frame, install it with a generous amount of grease. If either the post or frame are made from carbon fibre, install it with a generous amount of carbon paste (may also be called carbon compound or carbon prep).
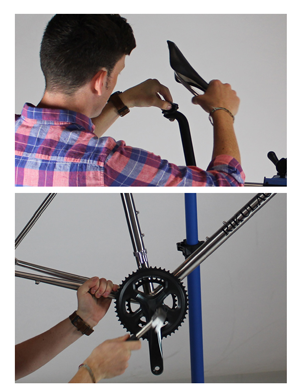
If you’re being particularly diligent, grease the thread of the seatpost clamp, before tightening it to the correct torque.
If you wish, here you can loosely fit the saddle onto the seatpost to get it out of the way—you’ll probably need to fine-tune its fore–aft position and angle at the other end of the build, though, once you’ve got the bike assembled and on the ground.
Crank installation
This varies quite significantly between brands and bottom bracket styles. Our demonstration bike uses a conventional threaded Shimano bottom bracket, which a conventional Shimano crankset pushes through. Grease everything up thoroughly, and have a rubber-headed mallet or hammer on hand—you may need to give the crank a little ‘love tap’ to get it through. In the case of Shimano’s cranksets, there’s a plastic cap that serves as a bearing preload; wind this in until there is no play in the crank arm, and tighten down the pinch bolts to the correct torque. Give the crank a spin to ensure that everything’s working as it should—easy peasy!
Brake calipers
This is pretty straightforward stuff—the only thing to pay careful attention to is the length of the anchor bolt for the front brake. Fork crowns come in all sorts of different thicknesses, which will affect what length anchor bolt is required. You need something that will grip onto the thread of the brake caliper and turn a good several times. If it only threads on a little way, it’s too short and your front brake might rip itself out under hard braking—not good.
If there are any star washers on the brake, don’t forget to install these between the brake caliper and the fork.
 Rear derailleur
This is pretty straightforward to fit. Just pay attention to the following:
Make sure you’re threading it in straight, and not stripping any threads.
Now’s a good time to double-check that the bolts connecting the derailleur hanger to the frame are done up nice and tight.
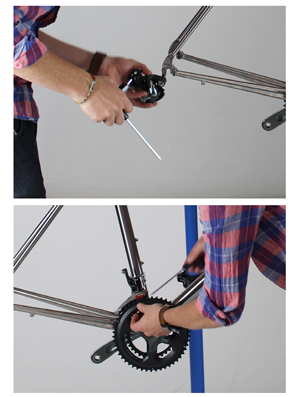
Front derailleur
Your front derailleur will fit to your bike in one of two ways—directly to a tab built into the frame (braze-on) or onto a band that goes around the seat-tube. Within the more common latter category, vertical adjustment is controlled either at the clamp-bolt or at the derailleur bolt. You want to set the front derailleur up so that the bottom of the cage clears the large chainring by just a couple of millimetres. In terms of lateral adjustment, for most brands you want the cage to align with the chainrings. SRAM is a notable exception—they have a pivoting front derailleur cage that you align via markings on the cage.
For now, you’re just concerned about getting the front derailleur in about the right position—tighten it onto the clamp so it’s ready for cabling up a few steps down the track.
Install wheels
This is a pretty elementary step, so we won’t go into it in great detail, but a couple of things to keep an eye open for:
Ensure rim tape is correct width for the rim.
Double check that there will be adequate tyre clearance through the frame for those that you’ve chosen for the build
Fit the wheels with the bike on the ground to be sure that they’re sitting straight in the dropouts—this will save time down the track when you’re adjusting the brake calipers.
 Install shifters
The practicalities of cabling are different from one shifter to the next, but the basic principles are the same—two cables out of each (one gear and one brake), with the shifter mounted in a suitable ergonomic position for your comfort, convenience and safety.
Position your levers on the curve of the handlebar so there’s a smooth transition from the handlebar into the section of the lever where you will rest your hand. The specific dimensions of handlebars vary a fair bit from one to the next, but you don’t want the lever set too high, putting your wrists in an awkward position, or too far around the curve, leading to an exaggerated reach. Also, factor in the position you’ll be in at the base of the handlebar (in the drops).
Cable it up
We’ve now moved on from the ‘bolting stuff on’ to the more fiddly adjustment stage of the build.
The mechanics of routing the cables of a bike are various, but in principle the steps are the same.
For gear cables:
Your gear cables are the ones with the smaller metal lug on the end. Your shifters may have been supplied with different length cables—a shorter one for the front derailleur, a longer one for the rear. Double check before you thread them through.
Peel the rubber hoods up to give some access to the internals of the lever. Shift the lever down into the position it would be in if it were on the smallest chainring at the front, or smallest cog (ie. biggest gear) at the rear. There will be an access port into which you thread the gear cable, which will then pass through the mechanics of the lever. On the other side of the lever, the cable will come out. Pull it all the way through; this will snug the end of the cable into the ratchet mechanism, which pulls the cable around when you operate the shifter. Whilst holding the cable taut, a couple of mock shifts back and forth with the lever will confirm that the cable is engaging correctly.
Measuring and cutting outers
There’ll be a channel that the cable is designed to come out of, into which the cable outer should neatly slide. Place one end of the cable outer into this, and measure out the length to cut. Depending on your frame, the cables may be routed internally or externally. For purposes of this demonstration, let’s assume that it’s externally routed. This will most likely mean that there are cable stops on the frame—metal tabs that cable outer slots into, before the naked cable continues its passage down the frame. These will be located on either side of the headtube or under the downtube.
When cutting the cable outers, make sure you factor in adequate length for the maximum height you will have the handlebars, and also allow for turn of the handlebars in both directions. Measure twice, cut once, and if in doubt, err longer rather than shorter.
When cutting gear cable outers, you should aim to minimise sharp turns or abrupt curves in the routing; you want the outers to guide the cable as smoothly and with as little friction as possible. Some manufacturers will specify length—SRAM in particular requires a long cable loop at the rear derailleur for best function.
Once you’ve got the outers cut to length, install the relevant ferrules on the ends and sit them in place; you are now ready to run the cables through. Maybe I’m weird, but I really enjoy the tactility of this step.
Make sure you don’t cross the gear cables along (or inside) the downtube, and run them down through the cable guide under the bottom bracket.
Tune the gears
The processes involved here vary between brands, but there are some basic principles in common. Both derailleurs have a High and Low limit screw (labelled H and L) that tells the derailleur how far it’s allowed to travel at each end of the spectrum; cable tension is the other main factor controlling the shift. Best thing to do is seek out a good Youtube video of the process, because it’s much easier to get a visual than it is to interpret from text.
Adjust the brakes
Make sure that the barrel adjusters on the brake calipers are wound all the way in, and (again, taking care with leaving adequate length for the outers) run the brake cables through. For detailed steps on adjustment, see https://rideonmagazine.com.au/brake-adjustment-the-basics-explained/
Crimp the cables
Once you have the gearing and brake cables in position, you need to cut them down to get rid of the excess. Using a sharp pair of cable cutters, trim the excess about 5cm past its fastening point and crimp the end of the cable.
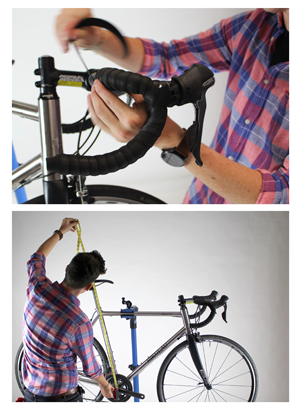 Bar-tape
Using electrical tape, position the cables on the handlebars. You want them taped up so that they don’t move around when you’re installing bar-tape over the top, and so that they’re in the most ergonomically appropriate position for your bars and hands. Then, carefully and evenly, wrap the bar-tape, paying careful attention to the transition around the levers. For a step-by-step guide, see https://rideonmagazine.com.au/get-a-grip/.
Finishing touches
By now, your bike is looking like a bike! But before you go pedalling off into the great unknown, take a few minutes to go over the bike and make sure everything is ship-shape. Taking the bike out of the stand and sitting it on the ground, run through the following checks:
Check that the skewers for the wheels are tight, and that the wheels are sitting straight in the dropouts
Check tyre pressure and make sure that they are inflated to the correct pressure
Check the height of the saddle
Check the angle of the seat (if you installed it in the stand, its angle may be slightly off)
Check the alignment of the handlebars
Go around the entire bike and check that all the stem bolts, seat clamps and seatpost bolts are tightened to the correct torque
Double check that the brake calipers, derailleurs and crankset are firmly attached to the bike
Lift and gently bounce the bike on the ground to double check that there are no suspicious rattles
Take a picture of your bike—it’s the cleanest it’ll ever look, and is a smart move anyway for insurance and theft mitigation purposes. It’s time to take a moment to reflect on your mechanical mastery, and enjoy the satisfaction of having built your own bike.
Congratulations—it might have taken a while, but now you get to head off on the first of many rides in what will hopefully be a long, happy life together. Happy riding!
Photography by Karl Hilzinger
Ride On content is editorially independent, but is supported financially by members of Bicycle Network. If you enjoy our articles and want to support the future publication of high-quality content, please consider helping out by becoming a member.